full screen background image

Sunday, 13 January 2013

A rose by any other name

Hi everyone.  Today I have for you an ATC I made using the "Man's Ruin" set:

I like to showcase some of the smaller images in the stamp sets and show how much fun they can be to focus on.  I used alcohol inks and several layers of Ultra Thick Embossing Enamel to create my shiny base ATC, then stamped the skull image with embossing ink and sprinkled silver powder on it.  I had to dry it carefully so as not to melt it into the background.  Once the ink set, I sprinkled some Dazzling Diamond glitter on the skull.  The edges of the ATC were inked up with more embossing ink & silver embossing powder.  I used my Dymo Caption Maker to create the text.  Peace.
 

Friday, 11 January 2013

Distress Blending and Stamping with Distress Stains

Most of you know I teach a technique tag class and Tim Holtz is probably my favourite inspiration. That said, I thought this technique really lent itself to Koi Tattoo. I've love this set ever since I first saw it and I'm so excited that I decided to use it for this.

Okay first here's what you'll need: a craft sheet, Distress Inks (various) and I does need to be Distress Inks because other inks don't do this technique as well, cardstock, Foam Blending Tools, a spritz bottle with water, Picket Fence Distress Stain and a stamp.

Using the foam blender and various distress colors, blend them on a piece of light colored cardstock. Start your blending on the craft sheet in a circular motion and move in toward the cardstock, this will help to keep from having the "hard"edge of the blending foam from showing up. Add color until you're happy with it.

Now take your spritz bottle with water and spray it in your hand and fling it, spritz it directly on the paper or however you want to to get various water spots on the blended inks. If you want you can speed up the drying time by using a heat tool.
 

Now for our last bit, shake up the Picket Fence Distress Stain really good and wipe it all over your stamp. (I used an oriental stamp and the waves from the Koi Tattoo set.) When you have it covered well, stamp in onto your background but don't press down hard, use very little pressure. To keep is more white, use the heat gun as soon as you stamp it, if you want it more faded, let it dry naturally.


Tada, you have your background! You can blur the white or fade it more using water as well. Remember though, this works best with Distress Inks and Stains.

And here's the finished piece.
Thanks for checking it out, I hope you give it a whirl

Until Next Time,


Thursday, 10 January 2013

Heartbreaker Tag

Hi there!  Today I am sharing with you a tag I made using the "Man's Ruin" set:

 I used alcohol inks and several layers of Ultra Thick Embossing Enamel to create my shiny tag, then stamped the skull image and text directly onto the dried UTEE.  Once the ink set, I colored the rose only with a purple marker.  The edges of the tag were sponged with black ink and it was finished up with a black ribbon.  Peace.

Wednesday, 9 January 2013

January's Sketch

Here's January's Sketch!


Please feel free to flip it, flop it, and make it your own. Just as long as you use your Bombshell stamps and have fun with it, it's good!

Be sure to use the Inlinkz below to share your creation with us AND have the chance to win the fabulous prize of a $20 gift certificate to the Bombshell Stamps store!

Here's my take on the sketch, using the Pimpin' Wolf stamp from the Sugar Daddy set.


Here's what the Bombshell Girls and Pin-ups did with this sketch!


Jodi using Mi Amor


~~~~~~~~~~


Monday, 7 January 2013

January Muse Monday: King of the Road

Hey Everyone! Alison here. It's the first Monday of the month, so that means it's time to announce the Bombshell Stamps Muse Monday set for the month of January. Each month, I choose a Bombshell Stamps set that I want the Design Team to feature. Each Monday, different DT members share a project making that set. It's really cool to see so many different ways to use one set! Each Monday, the Bombshell Girls will be featuring a project using King of the Road. Here's what the set looks like.

Here's what I made using this set.


And here is Kelli's project.


I hope you have enjoyed the first 2 projects featuring King of the Road. Be sure to check back every Monday for Muse Monday! Have a great day!

Sunday, 6 January 2013

A little mermaid love

Hey Bombshell lovelies!
Emily here! I must be on a roll with projects! But this is my first card of the new year!!! Of course I couldnt resist using Mermaid Treasure. I stamped her out in Memento, colored her with Prisma marker, and Stampin up. You cant really tell but shes half popped up on pop dots. This set is probably my favorite set, and most used/loved set. Its probably because of that cute sentiment "Its your Lucky day... check out the booty." Its my hands down favorite of the whole Bombshell collection. What is your favorite Bombshell set? Or atleast your current go to set? Leave a comment below with your answer, because I am dying to know! I hope everyone is having an amazing weekend.

-xo


Friday, 4 January 2013

Last minute make a gift

Hey friends :) EMILY here with my Gift post. Sorry I have been MIA this round with you all, but I have been out with work and personal life. But I am back and ready for action!!!

This project is a triple threat for you!!! Its my MONDAY MUSE!!! For the Pinstripes set, its my Blog Hop (that I wasnt around for!!-- sorry about that) and its my Tutorial Friday idea!!! ;) How great right?!

My daughter is in town, so I better get a move on! HAPPY NEW YEAR!! :)

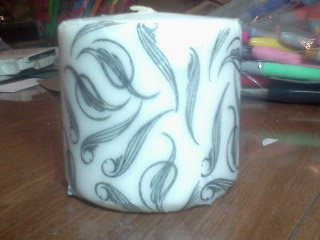
Things you will need:
white gift wrap tissue paper
ink
Stamps- Pinstripes used
Candle-- Unscented
wax paper
and a heat gun


--Stamp images on a strip of tissue thats the width of the candle. You can cut pieces out, but I chose to do a wrapped piece.

--Place tissue on candle, then wrap wax paper around the candle and the tissue. (I typically do this, but I am out of wax paper, as I did the cool mom thing and made rice krispies with my baby bombshell the other day and I am out.)

-- Heat it up and be careful not to burn the paper or leave in one area for too long!!

Pretty simple Idea for a great and easy gift. :)

Thursday, 3 January 2013

Happy New Year from Jenn!

Hi everyone!  I'm Jenn and I'm super excited to be posting for my first time as the January 2013 Pin-Up!  For today's creation, I decided to make a New Year's card for a friend of mine:
 I stamped "Man's Ruin" directly onto my DP from My Mind's Eye, using some orange Stickles for a pop of color.  "enjoy" sentiment is a sticker from SRM Stickers.  This stamp is so gorgeous, isn't it?  I look forward to showing you how versatile this set is this month, I've been having a blast playing with it!  Peace.

Meet Ms. January!

Jenn Borjeson is our Ms. January and brings her fresh style and flair to Bombshell!

Here's a little interview with her so you can get to know her better!

Brief info about yourself, including your name, where you live, your family (if you want), etc.
My name is Jenn Blakeney Borjeson and I live in Sebastopol, CA. We recently relocated from Massachusetts to Northern California and I am loving it here. I'm 41 years old. I'm married and we have 2 teenagers. Our son Trevor is 19 and our daughter Cassidy is 17.

2. How long have you been stamping and/or crafting?

A little over 10 years

3. What are your favorite Bombshell sets and why?

I love the Sugar Skull sets. I'm drawn to gothic images and the like, and the Sugar Skulls are so versatile. I like that I can color them up to be pretty and dainty, dark and grungy, or anything in between.

4. What kind of projects do you like to do?

I really love to do mixed media projects, but I spend a lot of time making cards. When I can spend a whole day with my hands covered in Gesso, paint, glitter, glue, etc., I am in my glory!

5. What are your favorite coloring mediums?

Prismacolor pencils and mineral spirits, hands-down!

6. Describe your crafting "style".

My style is cute and creepy. I tend to gravitate towards the real sugary sweet cute images and the dark gothic ones, I guess I like contrast. :D

7. Describe your crafting process. Do you start with a stamp set? A sketch? A technique you want to use?

I usually print myself a list once a week or all the things I want to get done that week, including my DT commitments and any challenges I want to enter, sorted by the date they are due. Then I get to work crafting!

8. Do you have any other hobbies?
I enjoy collecting things like beach shells and rocks, angels, and anything with peace signs on it. I love to read -- Stephen King is my favorite author so I'm usually waiting for his next book to come out.

9. Free for all including little facts, etc. about you.

I'm a happy girl, I love to smile and laugh and I love to make other people smile and laugh. I am overweight but I am healthy and my husband makes me feel like the most beautiful girl in the world, so I don't let it stress me out too much. I am a Leo. I believe in ghosts, spirits, and aliens. I love tattoos and currently have four of them, definitely want a few more. I would do anything for the people I care about. I am sorta kinda addicted to the Internet, chocolate, coffee, all-things-pumpkin-flavored, and Middle Eastern food. I hate mushrooms. I just got a Nook and although I like it, it will never replace a big old hardcover book (love the smell of paper...). So this is me! Thanks for having me as the January Pin-Up, I'm so happy to be here!

Here are three of Jenn's favorite Bombshell projects!


Now that you've learned more about our Ms. January AND feasted your eyes on her artwork, go check out her blog for even more inspiration!


Wednesday, 2 January 2013

Happy New Year Diva


Happy New Year or Happy Birthday.  This gorgeous darling does the trick. The card itself is a bit of a trick.  It's a tri-fold card with a clear acrylic layer at the front.


The first layer of the card features the gorgeous diva from Bombshell Stamp's Butterfly Queen set.  She's stunning and makes me yearn for the body I had in my younger years.  The acrylic layer is adhered to one of the cardstock flaps.  To hide the adhesive, I added a border and then another one on the other side for balance.   


In the shot above you can see the layers folded out.   The second layer is created with a stamp from Bombshell Stamp's Pin Stripes set.  It's colored with Copics in an art deco style. 


On the inside I stamped the same pin stripes image using a stamp off technique.   You can just barely see it behind the Butterfly Queen.


And lastly, a shot with the card laying down.  You can see the neat effect of having her on that clear layer in front of the pinstripe/art deco layer.   


Supplies: 
Stamps: Bombshell Stamps (Butterfly Queen and Pin Stripes)
Paper: SU Cardstock, Acetate
Ink: Memento
Coloring: Copics
Tools: Martha Stewart border punch