Hey Bombshells!
There's still time left!
Come play along with our July Challenges!!! You might just win your very own Bombshell Stamps set!
July Color Challenge
July Sketch Challenge
July Pin-Up Challenge
I created a small card for the Bombshell Stamps Color
Challenge this month! For the color scheme and the rest of the design
teams' take on this challenge click here.
I used the "Rosie the Riveter" Digital Stamp Set, Bazzill Cardstock, Spectrum Noir Markers, and a little bit of bling by Nicole.
Spectrum Noir Markers Used:
FS3
BT4
BT7
LV2
BP6
EB5
Happy Crafting!
- Kim
Showing posts with label Rosie the Riveter Digital set. Show all posts
Tuesday, 22 July 2014
Friday, 11 April 2014
Rosie's gone all ATC on us!
Hidy Ho, everyone! I just wanted to share one of my recent Bombshell projects with y'all. A couple of weeks ago I attended a FaBuLoUs artist retreat here in Texas for colorists. It was a weekend filled with great friends (old and new), great food (all new, no old), and some serious marathon coloring! You can read about it on my blog HERE
One of the things we did for the retreat was an ATC exchange. There was no doubt in my mind that our Miss Rosie needed to be the star of my ATC. So, I magically gave her some colored pencils to hold on to (can you say Photoshop!) and colored her all up with my trusty Prismacolor Pencils. I used aluminum-tape-covered cereal boxes to create the embossed background. For the gears I covered cardstock with aluminum tape then diecut them out.
Isn't she AWESOME? I just love our Miss Rosie!
oh, Oh, OH!!!!
I have a few extra ATCs leftover...so, if anyone wants one, take some time and leave a comment here AND on my blog at the link provided above...at the end of the first paragraph.
I have 5 to give away!! (one per person please). First come, first served. When they're gone...they're gone! hurry, Hurry, HURRY!!! It's a Torrey original!! You know you want one!! YOU CAN DO IT! ACT NOW (offer ends soon, some restrictions apply, offer not available in all areas--like on Mars).
Okay, I'm done now.
I have 5 to give away!! (one per person please). First come, first served. When they're gone...they're gone! hurry, Hurry, HURRY!!! It's a Torrey original!! You know you want one!! YOU CAN DO IT! ACT NOW (offer ends soon, some restrictions apply, offer not available in all areas--like on Mars).
Okay, I'm done now.
Thursday, 31 October 2013
You Can Do It!
I just had to play with this newly released digital stamp set from Bombshell Stamps - Rosie the Riveter. It was released at the beginning of the month, so might as well finish off the month of October with Rosie. I know it's taking a break from Fall and Halloween colors and stepping back to a patriotic color theme. I hope you don't mind as it seems to suit Rosie just fine.
Suppliers:
Stamps: digital (Bombshell Stamps - Rosie the Riveter.)
Ink: distress ink (Ranger/Tim Holtz)
Printed Paper: BoBunny.
Cardstock: Poppy Parade (Stampin' Up), blue (Creative Memories)
Tools: embossing folder (PaperStudio), circle cutter
Coloring: markers (Copic)
Tuesday, 29 October 2013
Hope with Rosie
Hi Everyone - Sharon aka Ms October - sharing a card made with "Rosie the Riveter" from the new digital set available at the Bombshell Store!
I love colouring and creating with pink and black - always looks effective!
Who can believe it's nearly November already??? Must mean Xmas is coming!!!
Tuesday, 22 October 2013
Ms October's Challenge Reminder!
Hi Everyone
Sharon aka Ms October here with a reminder for my "colour" challenge for the month of October - let's see what you can create using "Black, Orange, Purple & Lime Green"!! Link up your creation here.
I've altered a coaster and used one of the new digital images from "Rosie the Riveter" set of digis! I just love this new set - great fun to create with! I added the witches hat from the "Halloween Costumes" digital stamp set to give my coaster a Halloween theme! Couldn't resist adding the wording "Be Afraid - Be Very Afraid"!
We look forward to seeing your spooky coloured creations!
Sharon aka Ms October here with a reminder for my "colour" challenge for the month of October - let's see what you can create using "Black, Orange, Purple & Lime Green"!! Link up your creation here.
I've altered a coaster and used one of the new digital images from "Rosie the Riveter" set of digis! I just love this new set - great fun to create with! I added the witches hat from the "Halloween Costumes" digital stamp set to give my coaster a Halloween theme! Couldn't resist adding the wording "Be Afraid - Be Very Afraid"!
We look forward to seeing your spooky coloured creations!
Saturday, 5 October 2013
Let's celebrate World Cardmaking Day Bombshell Style!
October 5th is the eight annual World Cardmaking Day and we're celebrating Bombshell Style!
World Cardmaking Day has its own official website with links to other blogs that are also celebrating, so there's sure to be lots and lots of inspiration on the Interwebs!
Marnie using Holiday Accessory
Kim using Cherry Bomb
Friday, 4 October 2013
Fabulous Friday Tutorial -- Using Patterned Papers #1
What do you do when you have colored an image, but don't have patterned papers to match? Or what if you have a color scheme in mind, but none of your patterned papers will fit the bill?
Simple solution! Grab some black and white patterned papers and color them!
Here's a quick not-so-fabulous tutorial to show you how to do just that!
But first, a preamble. Because I'm like that. If you're going to use Copic or alcohol ink markers, you'll have to use patterned paper that's printed on cardstock. If you use that thin stuff, your ink will spread and make a huge mess. Guess how I know? However, if you use colored pencils to color, it doesn't matter what kind of paper you use, though if you use OMS to blend, that could present a problem.
Now, here's a digression from the subject. One of the gals on our Bombshell Babes Facebook Group asked about shading an image.
Here's Rosie the Riveter Digi stamp that was laser printed onto Neenah cardstock then partially colored with Copic markers.
I've placed a transparency over Rosie and used purple and green Sharpie to show you the shading that I used. The purple is the deepest color that I used, which was E21. The green shows the second deepest color that I used, E00, which was blended over E21. I used E000 to blend the colors more, then went back over them as needed.
In the final colored version, BV00 was used over the E21 to give a bit more shading to the hairline, around the eyes, the side of the nose, under the face, and along the arms. Chalk pencil was used to add a pink blush to her cheeks. The photo is kind of horrendous. She's not quite as orange in real life and she's in focus too.
So, back to the quick part of the tutorial.
My color scheme for this card is orange and red, so Rosie the Riveter was colored accordingly. I don't have patterned papers in that particular color combination. However, using this color scheme is one of the challenges for Splitcoast Stampers' Hope You Can Cling To Challenges, which is a month-long event. People will be making cards and sending them to a hospital that treats breast cancer patients and their families. It's a great cause and you should check it out using the link above. I also think that Rosie the Riveter is perfect for encouragement cards and for Breast Cancer Awareness month.
Yes. I digressed again. I used a black floral pattern and a music notes heart pattern from the Irresistible 6x6 pad by Authentique and simply colored to match my stamped and colored image.
Here's a photo of the papers that are partially colored using the same Copic markers I used to color Rosie.
After I took the photo, I finished coloring both patterned papers, then also colored red and white polka dotted paper, from the Lovely 6x6 pad by Authentique. The dots were originally white and the red didn't quite match the red of Rosie's lips and nails. After coloring the red paper with YR02, the red matched and the polka dots were orange. Gotta love when the matchy matchy thing works out!
I also ended up coloring some musical notation patterned paper from the Irresistible 6x6 pad before die-cutting it with Alterations flower dies. These four flowers were stacked, a clear button was adhered to a circle punched from my orange and red polka dot papers, and the flower embellishment was stitched onto my card front.
Here's the finished card!
I'm not really very good at these tutorials, so I hope you learned something from all the rambling above. I will be back with "Using Patterned Papers -- The Sequel" one day.
Thanks for visiting today!
Copic markers used:
Skin: E000, E00, E21, BV00
Lips: R27, R37, R56
Hair; N02, N04, N06
Shirt: YR00, YR02, YR04, YR16, YR18
Bandana: Ditto, except the dots are R37, R56
Flowers and hearts on patterned paper: YR00, YR02, YR04
Red dotted paper: YR02
Simple solution! Grab some black and white patterned papers and color them!
Here's a quick not-so-fabulous tutorial to show you how to do just that!
But first, a preamble. Because I'm like that. If you're going to use Copic or alcohol ink markers, you'll have to use patterned paper that's printed on cardstock. If you use that thin stuff, your ink will spread and make a huge mess. Guess how I know? However, if you use colored pencils to color, it doesn't matter what kind of paper you use, though if you use OMS to blend, that could present a problem.
Now, here's a digression from the subject. One of the gals on our Bombshell Babes Facebook Group asked about shading an image.
Here's Rosie the Riveter Digi stamp that was laser printed onto Neenah cardstock then partially colored with Copic markers.
I've placed a transparency over Rosie and used purple and green Sharpie to show you the shading that I used. The purple is the deepest color that I used, which was E21. The green shows the second deepest color that I used, E00, which was blended over E21. I used E000 to blend the colors more, then went back over them as needed.
In the final colored version, BV00 was used over the E21 to give a bit more shading to the hairline, around the eyes, the side of the nose, under the face, and along the arms. Chalk pencil was used to add a pink blush to her cheeks. The photo is kind of horrendous. She's not quite as orange in real life and she's in focus too.
So, back to the quick part of the tutorial.
My color scheme for this card is orange and red, so Rosie the Riveter was colored accordingly. I don't have patterned papers in that particular color combination. However, using this color scheme is one of the challenges for Splitcoast Stampers' Hope You Can Cling To Challenges, which is a month-long event. People will be making cards and sending them to a hospital that treats breast cancer patients and their families. It's a great cause and you should check it out using the link above. I also think that Rosie the Riveter is perfect for encouragement cards and for Breast Cancer Awareness month.
Yes. I digressed again. I used a black floral pattern and a music notes heart pattern from the Irresistible 6x6 pad by Authentique and simply colored to match my stamped and colored image.
Here's a photo of the papers that are partially colored using the same Copic markers I used to color Rosie.
After I took the photo, I finished coloring both patterned papers, then also colored red and white polka dotted paper, from the Lovely 6x6 pad by Authentique. The dots were originally white and the red didn't quite match the red of Rosie's lips and nails. After coloring the red paper with YR02, the red matched and the polka dots were orange. Gotta love when the matchy matchy thing works out!
I also ended up coloring some musical notation patterned paper from the Irresistible 6x6 pad before die-cutting it with Alterations flower dies. These four flowers were stacked, a clear button was adhered to a circle punched from my orange and red polka dot papers, and the flower embellishment was stitched onto my card front.
Here's the finished card!
I'm not really very good at these tutorials, so I hope you learned something from all the rambling above. I will be back with "Using Patterned Papers -- The Sequel" one day.
Thanks for visiting today!
Copic markers used:
Skin: E000, E00, E21, BV00
Lips: R27, R37, R56
Hair; N02, N04, N06
Shirt: YR00, YR02, YR04, YR16, YR18
Bandana: Ditto, except the dots are R37, R56
Flowers and hearts on patterned paper: YR00, YR02, YR04
Red dotted paper: YR02
Friday, 20 September 2013
Tinted Metal Rivets
When the digital Rosie the Riveter image was released by Bombshell Stamps, this great embossing folder of Riveted Metal by Tim Holtz came to mind. It goes perfectly with Rosie. And what better material to emboss using that folder than metal. Of course I had to distress it some with alcohol inks. Here's how I did it.
Here's a picture of the supplies. for the metal distressing.
I picked a sheet of purple metal to emboss.
I cut it to size and then ran the folder with the metal through my Sizzix.
Here's a shot of the embossed metal.
To tint it, I used some Tim Hotz/Ranger alcohol inks. I added a few drops of two different colors of alcohol inks onto my pad and applicator.
Then added some blending solution before applying the ink to the metal.
The blending solution took some of the purple tint off of this metal, but I was good with that. It gave me the effect I was looking for.
You can clean up your teflon work mat with a bit of blending solution and a tissue. I just squirt a bit of the blending solution on my mat and then wipe up.
Oh and for grins, here's my storage container. I made a couple of boxes and dividers out of packaging chipboard. Works perfectly.
And the outside of the box. Of course it has to have an alcohol ink finish to it if the box is going to hold alcohol inks. Right?
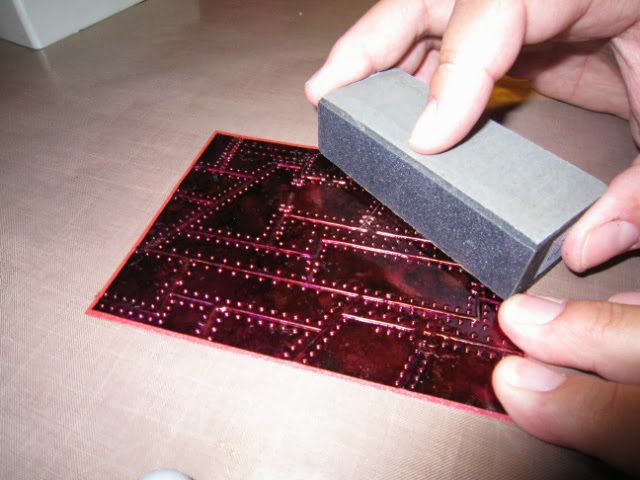
I applied adhesive to it and then applied the metal to a cardstock layer. This gives the thin metal sheet more stability as I distress with a sanding block.
Rubbing off the top layer of ink from the metal using a sanding block.
Here's the finished and sanded metal. Love the texture and depth.
I added Rosie to the metal and voila.
Rosie's colored with my Copics.
Tuesday, 17 September 2013
A New Digital Set featuring Rosie the Riveter Bombshell Style!
Bombshell's newest Digital Stamp set, Rosie the Riveter, will be perfect for those occasions where you want to offer encouragement to someone.
The Bombshell Girls have created some inspiration for you using this great new set!
Subscribe to:
Posts (Atom)