full screen background image

Friday 28 February 2014

Fabulous Friday Tutorial - Ombre Hibiscus Charm

Hi Bombshells!

Kim here, with a Fabulous Friday Tutorial. Using the hibiscus stamp from Hula Girl, I created an ombre charm for a necklace.
Supplies:
Bombshell Stamps - Hibiscus stamp from Hula Girl
-29mm square metal blank from Vintaj
- Agate and Verdigris Vintaj Patinas by Ranger
- small paintbrush
- non-stick craft sheet by Ranger
- Ranger Archival Ink in Jet Black
- Fiskars Stamp Press
- Double Sided Tape
- Jump Ring / Pliers / Chain Necklace

To start, you will need a 29 mm square metal blank (Vintaj) and Vintaj Patinas in Agate and Verdigris. On a non-stick craft sheet (Ranger) squirt a little bit of the patinas.
 Using a paintbrush, dab a small amount of Verdigris into the Agate so you have a light blue/green color and paint it on the top of the metal plate in a dabbing motion.
Mix the Agate and Verdigris together to make a medium blue/green color and paint it in the middle of the metal blank using the same dabbing motion so you don't have streak marks on the charm.
Next mix a small amount of the light and medium blue/green and dab it in the middle of the two colors to blend them.
Then using the Verdigris paint straight from the bottle, paint the bottom of the charm.
Mix a small amount of the medium blue/green color and the Verdigris together and blend the middle and bottom colors together on the charm.
Let the charm dry for a few hours until it is completely dry. Once it is dry, place double sided tape beneath the charm so it doesn't slide around when you stamp. Then using a Fiskars Stamp Press, place the Hibiscus stamp onto it and ink it up with Ranger Archival Ink in Jet Black. Then turn the press over, carefully line up the stamp onto the middle of the charm and press down to stamp.
Be carefully when removing the press from the charm so the stamped image does not smudge.
Once your image is stamped, let it completely dry. Once it's dry you can remove it from the double sided tape. All that's left to do is attach a jump ring to your charm and add it onto a chain necklace!
I'm so excited to make these charms with some of the other smaller Bombshell Stamps! Which stamp would you use?

Happy Friday!

Thursday 27 February 2014

Dem Bones!

Hi Holley here with a cute card using the digital Bombshell stamp set Muertos Doll.
I created a background using stamps from Man's Ruin Bombshell Stamp set.


Cheers Holley!

Wednesday 26 February 2014

February's Hump Day Hop!

Hello and welcome to the February 2014 Bombshell Stamps Hump Day Hop!  Alison here, and this month I decided to go with a color challenge. I was inspired by a color palette from Design Seeds. Check it out.

The participants had to use at least 3 of the colors shown here with only black, white, and neutrals for their projects. Below is the full hop list. Please be sure to stop by everyone's blog and leave them some love!

Tuesday 25 February 2014

February Challenges Reminder!

Hi Everyone!

Kim here, sharing a card I created for Ms. February's Pin-Up Challenge which is to Bring the Heat and create a hot card for the love in your life!  I used the Man's Ruin set.
Come play along with us in our February Challenges for your chance to win your very own Bombshell Stamps set!

Ms. February's Challenge:  http://bombshellstamps.blogspot.com/2014/02/ms-februarys-challenge-bring-heat.html

February Sketch Challenge: http://bombshellstamps.blogspot.com/2014/02/februarys-sketch.html

Monday 24 February 2014

February Muse Monday: Week 4- Sugar Daddy

Welcome to the 4th week of the month! Alison here, bringing you the last installment of February's Muse Monday. All month long, we have been showing you some fun projects using the featured set, Sugar Daddy. You are almost out of time with the month long sale, so if you haven't picked up this set yet, now is the time to do it.
Take a look at a few more projects made by the Bombshell gals. I hope you have enjoyed this month's projects!

Kathi who also modified February's sketch!

Sunday 23 February 2014

Guest Design Team Call!

Bombshell Stamps: Guest Design Team Call!

It's time to select our next six Bombshell Pin-ups (Guest Design Team members)! Bombshell Stamps features vintage pin-up and tattoo images, so please be sure to check out our style to make sure that you're comfortable using them!

Each Pin-up serves for one month during which s/he receives a free set of stamps, a generous discount to Bombshell's store, is featured on Bombshell Stamps' website and blog, sets our monthly challenge, and shares four (4) items (cards, scrap layouts, altered art). Participation throughout the next six month term (October - March) is actively encouraged.

If the Pin-up rocks her guest design gig, she'll be asked to join the Bombshell Girls (our Design Team).

Please send an email containing the following information to: designteam@bombshellstamps.com

1. Name:

2. Address:

3. Email:

4. Phone number:

5. Blog or website address:

6. Links to any online galleries you may have:

7. Related forums/message boards that you like to visit and participate (we do NOT need your forum nickname):

8. Three (3) items -- cards, altered items, or scrapbook layouts using stamps as the main focus.

Your submissions don't need to be brand new and do not need to have Bombshell Stamps used, but should not have been published or submitted for publication for a printed or online magazine. However, if you do have Bombshell Stamps, please use them!

Keep in mind that Bombshell Stamps' images are mostly open-line images so your coloring skills should be excellent.

9. Please note if you are a current or past design team member for any other companies. (We do not expect you to work solely for us).

10. Please tell us a few words about what you like about stamping and why you'd like to become a Bombshell Stamps design team member.

All applications must be received by 12:00am PDT on March 14, 2014 New design team members will be contacted by March 20, 2014.

Saturday 22 February 2014

Rebel, Let's Ride

It's getting warmer around these parts. The other night we even ran the kids to and from the soccer fields on our motorcycles.  Yay!  I'm excited to have my two wheels dusted off a bit!  Having riding season around the corner inspired this card along with a sketch from CAS(E) this Sketch..   The card features the Live to Ride stamp set from Bombshell Stamps.


I stamped the wheels and the saying with VersaMark and embossed them with colored embossing powers.   Papers are from My Mind's Eye.   Cardstock is from Stampin' Up. 


Here's the sketch I used.


Friday 21 February 2014

Fabulous Friday Tutorial - Faux Snakeskin Background


 Start with a Texture Disperse stencil.  Some Distress Inks light brown to black with a ink tool or two.  Perfect Medium Ink and Perfect Pearls in gold and copper.
 
First apply the lightest brown here Pumice Stone to the cardstock base.
Tape the stencil over the cardstock and begin applying ink working with layers of browns in a V shape down the stencil.  Here I used Frayed Burlap and Brushed Corduory.
Continue adding color getting darker here applying Walnut Stain & Black Soot.
Remove the stencil and clean it before moving on to the next step.
Now replace the clean stencil offset over the inked piece and sponge the Perfect Medium over the stencil.  Remove the stencil and clean it once more since we are now done with it.
 Now brush on the gold and copper Perfect Pearls in a V strips down the piece.  Brush away excess.
Your Faux Snakeskin is complete you can cut your piece down and add it to your project.

 For this project I used All My Heart and Banner Sayings colored with Copics to match the background.

Thank You so much for stopping by have a great day!

Wednesday 19 February 2014

Heartbreaker!

Hi Holley here with a quick card using the wonderful skull stamp from the Man's Ruin Bombshell stamp set!


Cheers Holley!

Tuesday 18 February 2014

Together....

My friend has a 7 and a half year old son, and he is mentally challenged and stays regulary with me. He saw that I was starting on making a card and wanted to stay here with me. Together we made a card, he truly enjoyed helping and working with the sewing machine.As his granddad used to be a skipper/captain we decided on a boat card,and see here the results on the pictures.
For this card we used:
Fabric
Versacraft ink
twine
Derwent pencils
sewing machine and thread
Together on one chair 


He was proud of the result.


Have a crafty day!
Kind regards, Stempelientje

Monday 17 February 2014

February Muse Monday: Week 3- Sugar Daddy

Hello out there! Alison here, to share the latest round of Muse Monday projects with you. We are featuring the Sugar Daddy set this month. And to help us celebrate, the set is on sale throughout February!
How would you like to see some inspiration from a few of the Bombshells? Enjoy!


Sunday 16 February 2014

Mermaid In A Bottle

Hi there! It's Leslie, MIA Bombshell Stamps guest designer, here with my latest Bombshell project... Mermaid In A Bottle! Yep, it's easy and it's loads of fun! I've wanted to do this for a long time and finally have the perfect mermaid stamp! ;)

Using the acetone-soaked twine with flame trick, I "cut" the wine bottle in two near the bottom. I cut a styrofoam ball in half and glued it into the bottom piece and filled the moat around the ball with clear glue. I sprinkled metallic blue, metallic seafoam and silver metallic micro marbles, as well as blue and green flock over the glue. I let it dry for several days and added a little more clear glue, micro marbles and flock to the sunken areas, and let it dry for several more days.


In the meantime, while the sea bottom was drying, I stamped the Bombshell mermaid, treasure chest and ship's wheel with sentiment on ivory cardstock and colored them with Copic markers. I attached the mermaid and the treasure chest to narrow pieces of clear cardstock and set them aside until final assembly. For the tag, I cut the ship's wheel and sentiment with a circle die and inked the edges, and set it aside.


I stamped the seaweed twice on clear cardstock and cut both clumps out. After a day's drying time, on the non-stamped side, I outlined the seaweed in green, teal and blue Stickles and sprinkled the blue and green flock on them while still wet. I let these dry for a couple days.


After a little over a week, it was finally time to assemble my project! I cut slits in the bottom and glued the mermaid, treasure chest and clumps of seaweed in place. I found some coral and fish stickers along with a tiny seashell in my stash which I thought were perfect additions to my sea bottom! I glued the top of the bottle back onto the bottom and let it dry for a day. I applied a narrow strip of clear packing tape around the seam and then wrapped the seam in twine.


I applied a bronze eyelet and jump ring to the tag, cut a small length of ball chain, and attached the tag to the bottle.


That's it! All you need are a few supplies and lots of patience! It's not something you can create in a day, but you need to give it a shot! It's guaranteed F-U-N and a definite conversation piece! Thanks so much for stopping by!
Hugs,
Leslie

Random Acts of Kindness Day

Tomorrow, February 17th, is Random Acts of Kindness Day!

Which kind deed will you be doing? Surprising a stranger with a hand-made card? Making some baked goods for a friend? Shoveling snow off of a neighbor's sidewalk? Find out more about Random Acts of Kindness Day at Holiday Insights.

Kim used Man's Ruin to create a card for a neighbor.

Friday 14 February 2014

Easy Peasy Covered Chipboard

Check out the frame on this card.  It's covered chipboard.   Yup, that stuff that usually takes way too much time to trim, file, distress, trim some more and and and... Oh what a headache and often not worth it.   How would you like to create a covered chipboard shape like this in mere minutes.   Well, here's how.


Card: "You're the Fairest of Them All"


Start with a steel rule die with the shape you'd like to cut.  I'm using these two dies from Tim Hotz.  Yes, it's two dies.   The large frame has an opening with a metal base.  The inset piece has magnets on the back that hold it nice and snug.   

Back to the tutorial

Simply measure how large of a piece of chipboard you'll need to cut.   Here I'm looking at 4 1/2 inches wide. 


I picked my cardstock....which can take hours and hours.   Gyah!  What happened to those early days when I didn't have that big of a selection to chose from.   Eh... wouldn't trade em for the set up I have now.  :-)

Note I also cut a piece of chipboard 4 1/2 inches wide.  I used a nice and sturdy piece that came from some package of paper.   I just save those for work surfaces and for, well, THIS.


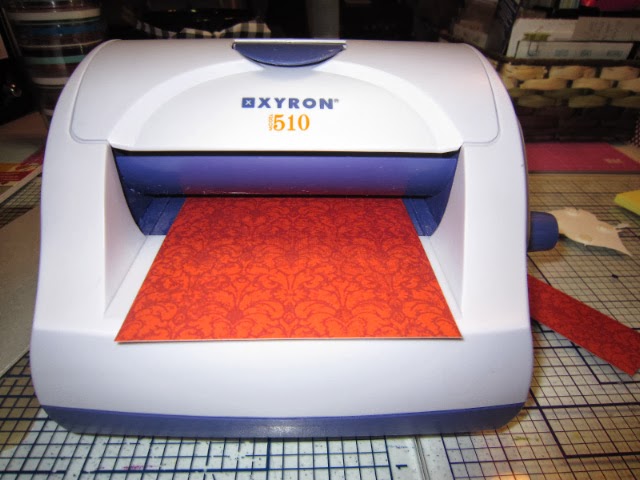
Here's the trick.  Run your paper through your Xyron.  It gives you a nice uniform coverage and is fast.  No drying time.  If you don't have a Xyron, use a quick drying wet adhesive for good coverage and to keep your paper from warping. 


Out of the Xyron


Adhering it to the chipboard.


Nicely adhered.


Run it through your die cutting machine.   A Sizzix or Cuttlebug work great. 


Separate out the die


And you have a piece that you could use as is, but I want to do away with those brown chipboard edges. 


I use a marker, in this case a Tim Holtz Disress marker to color the edges.   Great color match to the paper.   
I also use a sponge and some Distress ink to add a bit of ink to the edges of the paper on the chipboard.  That way if there's a slight color difference from the paper to the marker I'm using, it blends it all in. 


And your frame is done.  


And here it is used on a card with mirror paper that I get in the craft department in large sheets and cut down.  As I was putting this together, I did note to myself that this frame is a bit large for this card and could use a larger canvas.  I may move it sometime in the future.  


Oh and note to self.  Don't take a picture straight on when using this incredibly reflective mirror board.  My hands are right under this devil's head.  It almost looks like a selfie. Oops. 


Papers by Little Yellow Bicycle and Authentique  Cardstock by Stampin' Up.

Stamp is from Bombshell Stamp's Cherry Bomb set.