full screen background image
Showing posts with label Cherry Bomb. Show all posts

Wednesday, 9 July 2014

Bombshell's July Sketch Challenge

Here's July's Sketch!


Feel free to take the sketch, flip it, flop it, and make it your own. The only rules are to use the sketch in some recognizable way and to have fun. Enter your project below for the chance to win a fabulous prize.

You don't have to use Bombshell's stamps, but if you do, you'll get an additional chance to win!Use the Inlinkz below to share your project with us!

Here are the Design Team's takes on the sketch!


Kim using Sugar Daddy and Bone Font

Alaine has used Cherry Bomb


Marnie with Love & Luck


~~~~~~~~~~~~~~~~~~~~~~~Inlinkz code below~~~~~~~~~~~~~~~~~~~


Friday, 14 February 2014

Easy Peasy Covered Chipboard

Check out the frame on this card.  It's covered chipboard.   Yup, that stuff that usually takes way too much time to trim, file, distress, trim some more and and and... Oh what a headache and often not worth it.   How would you like to create a covered chipboard shape like this in mere minutes.   Well, here's how.


Card: "You're the Fairest of Them All"


Start with a steel rule die with the shape you'd like to cut.  I'm using these two dies from Tim Hotz.  Yes, it's two dies.   The large frame has an opening with a metal base.  The inset piece has magnets on the back that hold it nice and snug.   

Back to the tutorial

Simply measure how large of a piece of chipboard you'll need to cut.   Here I'm looking at 4 1/2 inches wide. 


I picked my cardstock....which can take hours and hours.   Gyah!  What happened to those early days when I didn't have that big of a selection to chose from.   Eh... wouldn't trade em for the set up I have now.  :-)

Note I also cut a piece of chipboard 4 1/2 inches wide.  I used a nice and sturdy piece that came from some package of paper.   I just save those for work surfaces and for, well, THIS.


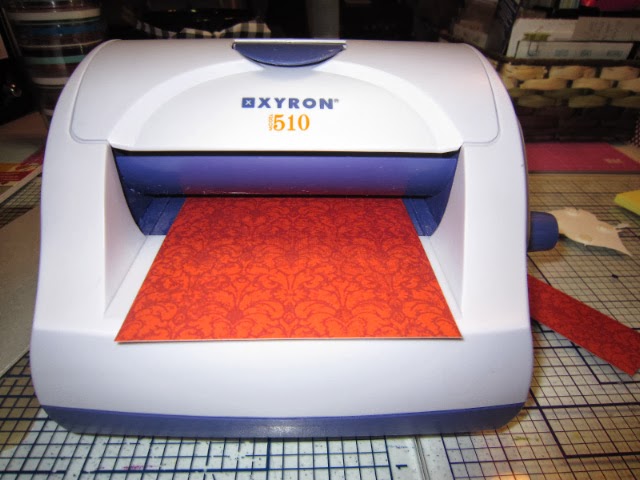
Here's the trick.  Run your paper through your Xyron.  It gives you a nice uniform coverage and is fast.  No drying time.  If you don't have a Xyron, use a quick drying wet adhesive for good coverage and to keep your paper from warping. 


Out of the Xyron


Adhering it to the chipboard.


Nicely adhered.


Run it through your die cutting machine.   A Sizzix or Cuttlebug work great. 


Separate out the die


And you have a piece that you could use as is, but I want to do away with those brown chipboard edges. 


I use a marker, in this case a Tim Holtz Disress marker to color the edges.   Great color match to the paper.   
I also use a sponge and some Distress ink to add a bit of ink to the edges of the paper on the chipboard.  That way if there's a slight color difference from the paper to the marker I'm using, it blends it all in. 


And your frame is done.  


And here it is used on a card with mirror paper that I get in the craft department in large sheets and cut down.  As I was putting this together, I did note to myself that this frame is a bit large for this card and could use a larger canvas.  I may move it sometime in the future.  


Oh and note to self.  Don't take a picture straight on when using this incredibly reflective mirror board.  My hands are right under this devil's head.  It almost looks like a selfie. Oops. 


Papers by Little Yellow Bicycle and Authentique  Cardstock by Stampin' Up.

Stamp is from Bombshell Stamp's Cherry Bomb set. 


Friday, 17 January 2014

Stickle me this!!!!

Howdy all! It is Friday and that means Fabulous Friday Tutorial Time! I have been PULLING out all my Stickles and having fun with them. I know a lot of people have bunches and bunches of Stickles - Like I do - but rarely pull them out (ehem - Kathi). I have even gotten mine out so much recently that I re-organized and hung them upside down from my cabinets so I can see them.

The thing I like about Stickles - they are all glittery goodness... but the glue part is clear - allowing you to put the Stickles on as thickly or as thinly as needed to create all sorts of goodness. This way you can allow the coloring underneath to shine through.

The first image above, is Madonna Woodcut all colored in pretty blues, yellows and purples. The Stars are the only open spot on here. No color there - So the first thing I did was to add silver Stickles to the stars. 

You can see that more close up here.  
But wait - that is just big globs. So in the next step, over the "suns rays" where I have graduated color, I wanted a little but of sparkle, but not overshadowing. I could have done this with a Stardust pen, but this is where the Stickles are so good. Because they are colored glitter - you can get it and add it and spread it out.  


I have used it with a paintbrush, but for things like this - these tight spaces - I use a straight pin. 

 
For this image I then highlighted the dark purple areas with the purple stickles. Again, I wanted the purple area I colored to show through, but I wanted to add some depth to the dark areas.


As a final step - I took mermaid stickles and outlined the darker blue areas of the image with them.


Once done, you can see the different colored glitters, but still see the lovely sparkly sprinkly on top.


So we have covered edging and spreading and highlighting. How about just plain old coloring?

For this tag below I took some little hats from Calaveras Fiesta and the cherries from Cherry Bomb and colored them completely with Stickles. Once they were dry, I cut them out, and made my own little embellishments. Specifically colored the way I wanted. Not only are they textured - but they are also really sparkly!

 Once everything was applied I used my Black Stickles to outline the To and the From, and to add sparkle to the dots on the edging.

I hope that this encourages you to pull out your poor neglected Stickles or other glitter glue and have some fun!!!!

Saturday, 5 October 2013

Let's celebrate World Cardmaking Day Bombshell Style!

October 5th is the eight annual World Cardmaking Day and we're celebrating Bombshell Style!

World Cardmaking Day has its own official website with links to other blogs that are also celebrating, so there's sure to be lots and lots of inspiration on the Interwebs! 


Tuesday, 3 September 2013

Ms. September's Challenge!

Jenn Cochran, Bombshell's Ms. September, has issued a "Layer It Up" challenge. Use at least three layers of paper, paint, ink, ribbon, etc. to create your Bombshell project.


Here are some of the multi-layered projects by our Bombshell Girls and Pin-Ups!


Here are 5 layers piled on nice and neat...  a striped stamped card base, an embossed white layer, a teal mat, another background stamped layer in coral, and then that wicked devil from Bombshell Stamps' Cherry Bomb set.


Here's a shot from the side so you can really see the layered dimension.  Two sets of layers are adhered using some dimensional adhesive for even more pop.  


 Alaine has a whopping 8 layers in one little area under the bow. :-) She used Peek-A-Boo Geisha.


Kim used 4 layers of cardstock and 3 layers of Coffins

Susie has used Panther Tattoo and 5 layers of card, papers and photos.


~~~~~~~~~~~~~~


Thursday, 22 August 2013

August Wacky Holiday- Be an Angel Day!

Be an Angel Day is a day created Jayne Howard Feldman. The object of the day is to be inspired to act like an Angel and be kind to others. Be An Angel Day is for the giver and the receiver , so if someone is kind to you express your gratitude openly- so spread a little kindness (and glitter!) in the world Bombshells!


Alaine used one of the other stamps from  Bombshell Angel


Sunday, 2 June 2013

Ms. June's Challenge!

Sharon Rogers, Bombshell's Ms. June, has issued a "Be Clear" challenge! She challenges you to use acetate or vellum with your Bombshell stamps to create a fabulous project!

Check out how the Bombshell Girls and Pin-Ups met this challenge!

Here's Sharon's Acetate Base card using Rose's Portrait (her favourite set!!):


A sheet of acetate is the cover of a shaker box.   
Gears and beads are in the shaker box. 


(from the archives)


Kathi using Ahoy Sailor on a clear card. Sorry 'bout the shadows!

Here's the inside!


 Jodi using Mermaid's Treasure


Alison used Butterfly Queen
Now you see her wings.......

Now you don't!


Alaine using Indian Princess


~~~~~~~~~~~~~~~~