full screen background image
Showing posts with label Tiki Party. Show all posts

Friday, 25 July 2014

Fabulous Friday Tutorial - Bombshell Cork Coasters

Hi Bombshells!

Kim here with a Fabulous Friday Tutorial!  Bombshell Cork Coasters!

 Supplies:
Bombshell Stamps - Tiki Party, Hula Girl, Hawaiian Girl
Cork Coasters - 4 pack from a craft store (I purchased mine at Michael's)
Tsukineko Memento Ink in Tuxedo Black
Copic Markers
Mod Podge
Paint Brush

First stamp the stamps of your choice onto the cork coasters using Tsukineko Memento Ink and let dry completely. I let mine dry overnight.
 Next, color in your stamped images with Copic Markers. I found that light or bright colored Copics worked best, and to only color in parts of some images so the whole image is not lost. Let these completely dry also. Mine took a few hours.
Then apply a coat of Mod Podge with a paint brush only onto the colored/stamped image areas. Let dry completely overnight.
Once they are completely dry, they are ready to use! All you need is a good luau! (Or a good drink!)
Note: I have used my coasters several times and they have held up pretty well. After a few uses some of the color has come off and lightened slightly. I have only used them for outdoor bbq's. These are great if you aren't using them frequently. And they just look cool!!!  If you find that your images are bleeding or the marker is coming off of the coaster you may need to use a thicker coat of Mod Podge or a stronger sealer.

Happy Friday Bombshells!
- Kim


Wednesday, 2 July 2014

Ms. July's Challenge -- Sun, Surf, and Sand

Jenn Borjeson, our Ms. July, has set this month's summery challenge which is "Sun, Surf, and Sand".

Take the challenge and create a project of your own. Share it with us, using the Inlinkz below, for a chance to win a $20.00 gift certificate to Bombshell's store! You don't have to use Bombshell's stamps, but if you do, you'll be given an additional chance to win the prize.

Here's Ms. July's project

Here are projects by the Bombshell Girls and Pin-Ups!


~~~~~~~~~~~~~~~~~~~~~


Friday, 30 May 2014

Fabulous Friday Tutorial - Tiki Straw Toppers and Drink Markers

Hey Bombshells!

Having a Luau this summer?!  Here are two easy and fun ways to dress up your Luau Cocktails using the 'Tiki Party' stamps!
Happy and Hungry Tikis make fun straw toppers!

Supplies:
Tiki Party Stamp Set - Bombshell Stamps
-Copic Markers
-Stamping Paper
-Black Cardstock
-ModPodge and brush or sponge
-washi tape
-scissors
-Tsukineko Memento Ink
-bendable straws

  First, stamp the Tiki Stamps onto your stamping paper, color with Copic Markers, and fussy cut out with your scissors.
 1- Next, adhere the cut out tiki god with Mod Podge onto black cardstock and then Mod Podge the top.
 2-  Let them dry completely. After they are dry and no longer sticky, fussy cut them out with your scissors.
3 & 4-  Here you can see the front and back. Adding the black cardstock to the back hides any marker stains that were showing through!
  5 & 6 - Next, take your bendy straw and hold it with the bend just a little lower then the top of the tiki god's head. Attach the straw to the tiki dude using two pieces of thin washi tape.
7 & 8 - Sideview^^
  And that's it! A super easy and fun way to adorn your cocktails at your summer Luau!


  Using white ribbon and the 'music, fun, cocktails' sentiment stamps, you can create a quick drink marker for your cocktail or wine glasses!
Supplies:
-White Ribbon
- Black Staz-On Ink
-beads (in different colors)
-safety pins

  Stamp the sentiments onto the ribbon with Staz-On Ink and let dry. Next, place your ribbon around the glass stem, add a bead onto a safety pin and attach it to the ribbon to hold it closed. Use different colored beads for additional cocktail glasses.
 Happy Bombshell Craftin'!
- Kim

Monday, 22 July 2013

July Muse Monday: Week 4- Tiki Party

Hello Bombshell fans! Alison here, bringing you Week 4 of Muse Monday. This month, we are showcasing Tiki Party. Have you been enjoying all of the fun projects so far? Remember, this set is on sale for the month of July, so snag it at a special price while you can! Here are some more new projects from the DT featuring the Tiki Party set.


Happy Crafting !

Monday, 15 July 2013

July Muse Monday: Week 3- Tiki Party

Greetings! Alison here, bringing you Week 3 of July's Muse Monday. This month's set is Tiki Party. Every Monday, some of the DT members will share projects made with this set. By the end of July,  you will have lots of inspiration. What's more, Tiki Party will be on sale for the entire month! Here's what some of the Design Team has created for your viewing pleasure this week.

Alaine was in Disney mode and used the Tiki Room Song as her inspiration and came up with this card:


Kim created a step card with the Tiki Party Set.

Monday, 8 July 2013

July Muse Monday: Week 2- Tiki Party

Hello again! Alison here, bringing you Week 2 of Bombshell Stamps' July Muse Monday. This month's set is Tiki Party. Remember, this set is on sale for the entire month of July! So if you don't have it yet, this is a great time to pick it up.
Every Monday, some of the DT members will share projects made with this set. By the end of July,  you will have lots of inspiration. Here's what some of the Design Team has cooked up for you this week.

Kathi's card


Monday, 1 July 2013

July Muse Monday: Week 1- Tiki Party

Hello Bombshell fans! Alison here. Welcome to July's Week 1 of Muse Monday. As you probably know, each month I chose a different Bombshell Stamps set to be featured here on the blog. And each Monday, different members of the Design Team feature projects using the chosen set. By the end of the month, you will have lots of fabulous ideas and inspiration for that set!  Plus, the featured collection will be on sale for the entire month! How fabulous is that?! This month's set is Tiki Party.
Isn't this a fun set? I love the Tiki totems and the flames! How about checking out a couple of projects made with this set?


Saturday, 8 June 2013

Name Your Poison Day

Hello Bombshell Fans! Alison here. I am happy to share with you June's Wacky Holiday. This month, it's "Name Your Poison." Here's some info about this unusual holiday as per Holiday Insights.

Name Your Poison Day is a day to make a choice. The term "Name Your Poison" is commonly used to suggest that you select among a number of options.This term has a negative connotation. The origin of this term is unknown. But, at the time, it probably referred to some unhappy choice. It is commonly used when asking someone what type of alcoholic drink they want. But, it is also used to refer to any choice of options, good or bad. For example, "Name Your Poison" may refer to selecting an ice cream flavor, a dessert choice, etc. Celebrate today by making a decision..... Name Your Poison.

And here is what some of the fabulous Design Team has created for your viewing pleasure. 

Kelli used Man's Ruin


Alison used Calaveras Fiesta and Tiki Party
 
Alaine also used Tiki Party for this tag


Thank you so much for visiting! Be sure to comment and tell us what YOUR poison is! Have a great day.

Sunday, 26 May 2013

May Wacky Holiday: Sunscreen Protection Day!

We love our Wacky Holidays here at Bombshell Stamps-it's a mine of inspiration!
May 27th is Sunscreen Protection Day just ahead of the summer and holiday season.   It educates and brings awareness to the importance of using sunscreens to protect yourself and your children from harmful UV rays from the sun. So remember to slap to on the sun screen!

See how the Bombshell Design Team has been inspired by Sunscreen Protection Day!


Sharon aka Ms June using Muertos Doll


Alaine Using Cherry Bomb

And inside. :-)
Michelle using Bucking Bronco & Wanted


Happy crafting everyone!!

The Bombshell DT x

Friday, 26 April 2013

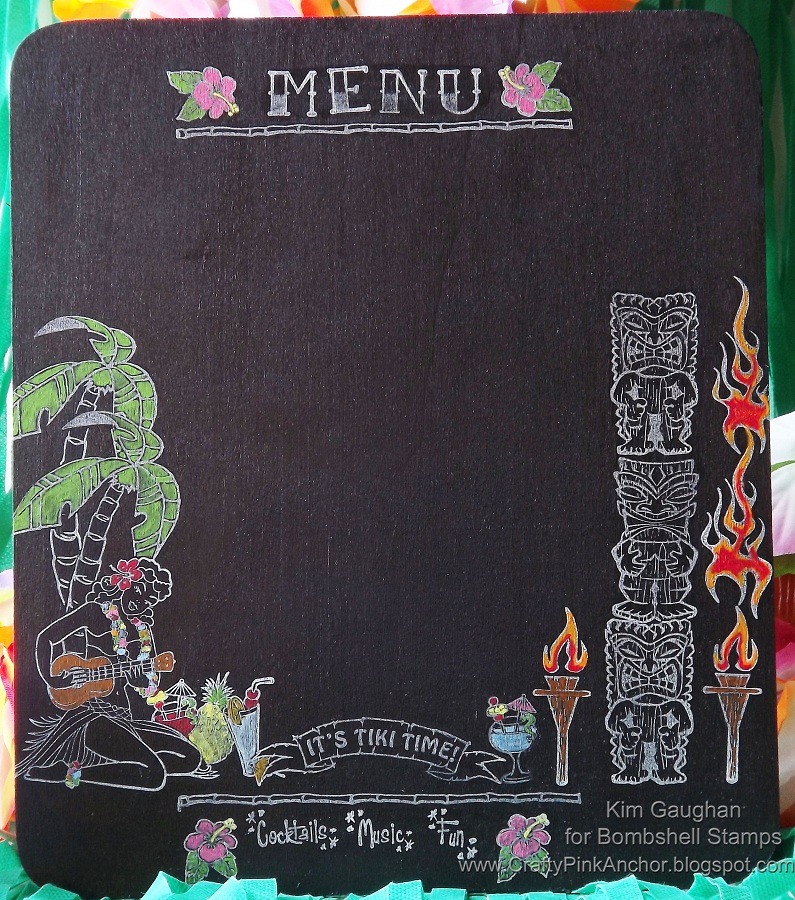
Fabulous Friday Tutorial - Bombshell Chalkboard Menu

Happy Friday Bombshells!

Is anyone else ready for summer?  It's Kim here with a Fabulous Friday Tutorial that is sure going to make you want to grab an icy drink! (with or without alcohol- take your pick!).  It's a chalkboard menu created with the Tiki Party, Hawaiian Girl, Hula Girl, and Tattoo Font sets.
Supplies Needed:
-Bombshell Stamp Sets - Tiki Party, Hawaiian Girl, Hula Girl, and Tattoo Font
-A rectangular wood board - 10 inches high x 8 1/2 inches wide, about 1/8 of an inch thick (I purchased mine at AC Moore)
-Folk Art Chalkboard Paint in Black by Plaid
-1 inch foam brush
-Tsukineko Brilliance Archival Pigment Ink Pad in Moonlight White
-Tsukineko Memento Ink in Tuxedo Black
-White Cardstock Paper
-Scissors
-Small Thin Paint Brush and a regular size paint brush
-Heat Gun Tool
-Acrylic Stamp Block and Stamp Cleaner
-Mod Podge in Matte
- Martha Stewart Craft Paints in Satin (Pink Dahlia, Blue Calico, Scottish Highlands, Habanero, Chestnut Brown, Marmalade, Surf, Chamomile, Spring Pasture are the ones I used)
-Disposable Gloves, good ventilation, water, paper towels, and chalk!
   Using the foam brush, apply the black chalkboard paint onto one side of the wood board. Once that dries, apply another coat of chalkboard paint. Then do the same for the back, making sure each coat is dry before applying another layer.  I used 2 coats of paint on each side, but depending on the wood and chalkboard paint you use you may need to use additional coats.  Apparently, drying time will vary from 1 -  24 hours depending on weather, so make sure to follow the manufacturer's instructions for the chalkboard paint you're using. Plaid has instructions and tips on their website for their brand of chalkboard paint.  Also, if your wood is really rough, you may need to sand it down first before applying paint.  The board I used was smooth so I didn't need to.

   While waiting for coats to dry, I started planning out the placement of my stamps on paper.  You will need to stamp your stamps in black ink onto white cardstock and fussy cut them out for later.  Once the board is dry, ink up the stamps with a light coat of Tsukineko Brilliance Archival Pigment Ink Pad in Moonlight White and start stamping them onto the board.  I used a lighter coat of ink so it would look more like the stamped image was drawn in chalk.
For the areas where the stamps overlap, first stamp the first image onto the board, example - the Hawaiian Girl, let it dry, and then place the cut out image on top of it.  Next ink the second image that will be behind the first one, example - the palm tree, and stamp it on top of the paper cut out image.
   After all of the images are stamped onto the chalkboard, use a heat gun for a few seconds to dry the images a little bit and then let the chalkboard sit for 24 hours before painting.  (The chalkboard paint itself needs to sit for 24 hours before it's conditioned according to manufacturer's paint instructions.)
 
   Once that loooooong 24 hours is up, paint in parts of the stamped images using Martha Stewart Craft Paints in Satin and a small tiny paint brush.  I used a very thin coat of paint and let some of the black chalkboard show through so the coloring would look more like it was colored in with colored chalk.  I had to restrain myself and not color in the Tiki guys, banner, and Hawaiian Girl because even a light coat of paint washed out the small features.

After the paint is dry, apply a thin coat of matte Mod Podge only onto the stamped image areas and let it dry.
In the circled area on the left the Mod Podge clumped up a little, so I smoothed it out while it was still wet.  On the right is the tiki guys after the Mod Podge has dried. 

So after all that waiting for paint and glue to dry, it's finally time to condition the chalkboard area where there are no stamped images.  I conditioned it with a yellow piece of chalk, but I think it would have been better to use white.
Clean the chalk off with a damp paper towel and your Bombshell Menu is all ready to use! 
   There are so many different kinds of chalkboard paint out there, so choose the one that suits you best and follow the manufacturer's instructions for it. I recommend wearing gloves while using the chalkboard paint and be careful when applying it because it's permanent when dry.  Also use it in a room that has good ventilation (I find it to be a little smelly and I am safety conscious, as you can tell!). 

   And last but not least, this project is great for any Bombshell Stamp Set. Whether it be this Tiki Bar Menu, a Girl's Ruin Night Menu, a Halloween Skeleton Menu...  And chalkboard paint comes in a ton of different colors.  The possibilities are endless! 

Happy Stampin!
- Kim