full screen background image

Tuesday 30 August 2011

August Hump Day Hop: Put Me in the Movies!

Greetings Bombshell Fans! Alison here. It's the last day of the month, so that means it's time for the Bombshell Stamps Hump Day Hop! I have really been looking forward to this hop, because it seems like the gals joining us this month have come up with some fantastic ideas! I can't wait to get hopping myself!

Here was this month's hop challenge. The theme is "Put Me in the Movies." Take a movie, and/or movie poster, and use it to inspire your Bombshell Stamps project! Any of your stamp sets will work. And, you can make anything you want. Sounds like fun, right? Let's get to it!
Here is the entire hop list:
Bombshell Blog: http://bombshellstamps.blogspot.com/ (you are here!)

Please visit all of these super talented ladies. And if you like what you see, perhaps you can join us for next month's Hump Day Hop! The next hop theme will be posted here next Wednesday. Thank you for hopping with us! Have a great day!

Monday 29 August 2011

Deadlines!

Greetings Bombshell Fans! Alison here, with some very important deadlines you need to know about. First, you have 2 weeks to submit your application to be a Pin-Up, which is our monthly Guest Designer. The deadline for submissions is September 14th. The term is 6 months and begins October 1st. You can see all of the important info about the DT call HERE.

Second, today is the last day to sign up for this Wednesday's Hump Day Hop. This month's theme is "Put Me in the Movies." You can find out all of the details and sign up in THIS thread. I do hope you will join us. Even if you don't participate, please be sure to hop!  

Have a great day!

Friday 26 August 2011

Shading with color pencils over Copic Markers

This is a tutorial for those of us not lucky enough to own the 17 gazillion colors of copic markers out there!  This is how we get to color like we do though!!!

Supplies needed:
Stamp/image of choice
Copic marker(s)* (I used BV02, G05, and E43)
Colored pencils*(I used prisma color pencils: Violet, Parma violet, grass green, and dark brown)
Low odor mineral spirits**
Blending pencils
memento ink
small jar with air tight lid(to put your mineral spirits in for easier use)
IMG_0844

To get started, pour some of your mineral spirits into the small jar and make sure the lid is on tightly, set aside.  Stamp image with memento ink.

IMG_0846

Next color your image with your copics making sure to get an even coat on your image. (I have just done the purple here.)

Next use your colored pencils to put your shading where you want to, or where you think they should be, after all it’s your picture…

IMG_0848

Now dip the tip of the blending pencil into your mineral spirits.  (Just the tip, you can always dip it back in if your blending pencil runs dry)

IMG_0849

Start rubbing your dipped tip onto your colored pencil marks and watch your lines disappear!

IMG_0852
wicked cool huh?! 

Now here is my finished image.  You may want to change blending pencils when you change colors, I didn’t for this one but if you have darker colors you may need to!

IMG_0853

*you can use any color pencils you want.. I have used Crayola, rose art, any old color pencil you have!!  I don’t know about other brands of marker as I only have these…if you try it with another brand of marker and it works let me know!!!

**There is a product called Gamsol that you can use for this also.  I like the low odor mineral spirits because it’s cheaper and does the same thing.  Gamsol is $6 for a couple of ounces and you have to order it online.  The low odor mineral spirits I use is $6 for a quart and I can get it at my local hardware store!

Thursday 25 August 2011

A Shabby Chic Heart Card


Hola, lovely Bombshells!  Cheryl here.  Last week I shared an easy embossing resist technique for creating interesting backgrounds.  This week I'm back to share what I made with the die cut panel I created in the tutorial.  

Our fabulous pin-up gal for August is Milo and she set our theme this month and challenged us to create shabby chic cards or projects.  Well, I have the "shabby" part down, not so sure about the "chic" part...LOL!

For this card, I used a gorgeous heart with wings image from the All My Heart set.  Believe it or not, there was a time when I hated hearts.  Not the ever-so-fierce organ that keeps me perky, but the super cute, saccharin sweet images that many stamp companies use in their Valentine's Day releases...BLECH!  Then I started to take an interest in religious themed art and the sacred heart was frequently featured in these types of works.  After that I was practically obsessed with it.  When Bombshell Stamps released the two heart sets, I was nearly over the moon.  Now I can't get enough...heck, I even like the cute stuff ;D  Funny how our tastes can change so drastically from one moment to the next :)

Monday 22 August 2011

Vintage bike

The stamp I used is of the set Vintage Motorcycle.I heat-embossed the image,coloured it with a Copic marker and glazed the tank,headlight,mudguards etc. Distressed the edges,faux stitching and some brads in the corners.


Friday 19 August 2011

Envy - a Tutorial

OK... so come on you all... you know you have it... all that PAPER-  - All that wonerful paper that you just HAD to have. And now you are looking at it like WTH was I thinking. If you are like me, you have it sitting in stacks all over the place, but just can't let it go even if you will NEVER use it on a layout or card. Well... There is one way to use it, and to save yourself some other money on Envelopes. I am here to show you a quick way to make an envelope out of one sided paper.

You start with paper that you are really not that excited about having anymore.

You cut the paper to 8.5" by 8.5". Then you get out your favoritist (I love making up some words) scoring tool and score the corners. The first two opposite corners are scored 3 inches from the point. The other two corners are scored 3 and 5/8 inches from the points.

After you have the scores you start folding... You start with the 3" folds and fold in toward the design paper.  Then you fold ONE of the 3 5/8" from the bottom.


After that... You fold under the little bitty corner flap. Next - open up the bottom fold again, and place tape as indicated.


Voila - - You have a finished envy!


This makes a standard A2 card envelope. You can make other sizes as well, just play with your math from school.


Hope this helps you all out, and you can now make your own envelopes and use up all that paper that you wouldn't otherwise use... since it will be inside an envelope AND quite possibly torn up.

An Embossing Resist Tutorial


Hello, lovely Bombshells of Blogland!  Cheryl here and I have a tutorial for you today involving embossing.

When I first started stamping 14 years ago and was on the fence regarding whether I wanted to make the investment into the tools and stamps needed for card making, it was the mystery of embossing that officially lured me over to the dark side.  I'll never forget my first encounter with a heat gun and a jar of that magic powder.  I embossed a simple sentiment onto the inside of a card and spent a good portion of the afternoon running my fingers over the shiny raised letters, completely mesmerized by the texture and the polished appearance.  I was hooked and embossed everything I could get my hands on.  It wasn't long after that, I learned the most important lesson regarding embossing...heat guns and acrylic nails do not mix...LOL!

Years later, I have shed the nails and I don't drag the heat gun out that much anymore.  However, once in awhile, I'll get the embossing bug and manage to get my fix with this technique that's been around for ages.

What we'll need:  a white die cut panel, a large background stamp, a small solid detail stamp, Versamark Ink, Onyx Black Versafine Ink, Spun Sugar Distress Ink, Tattered Rose Distress Ink, a sponge applicator, clear high gloss embossing powder, and an embossing buddy (not pictured).

We'll also need a piece of blank newsprint, a heat gun, and a small craft iron.

Swipe the embossing buddy over the entire surface of the die cut panel.  Lightly shake off the excess.  

Liberally coat the surface of the background stamp with Versamark Ink.

Lay the die cut panel face down on the background stamp.  

Cover with a piece of the newsprint and use your fingers to press the die cut onto the background stamp without moving it.  I find it much easier to stamp large backgrounds this way as opposed to taking the block and stamping onto a piece of paper.  With this method, you get a crisp, clean impression every time. 

Cover the die cut with embossing powder and heat with the heat gun.

We have achieved a nice shiny raised pattern on our die cut.

Using the sponge applicator, liberally apply Spun Sugar Distress Ink to the die cut.  The background  design will begin to emerge as the embossed areas "resist" the ink.

Smudge Tattered Rose Distress Ink around the edges for a deeper color.

With the die cut face up, cover with a clean section of the newsprint page used earlier. 

Using the craft iron, iron the die cut using a circular motion.  The embossed design will begin to appear on the newsprint as it melts the embossing powder.

The entire design will transfer over to the newsprint completely after a few minutes.

This process leaves our die cut panel smooth.  Perfect for more stamping and additional embossing.

I chose this tiny skull and crossbones stamp from the Love and Luck set to add some additional pattern and detail to my panel.  I first swiped the panel with the embossing buddy to ensure a clean image.  Then I stamped 3 or 4 skulls at a time and embossed them with embossing powder.  

I tried to place them randomly on the panel, but my OCD nature really wishes they were in a more uniform pattern.  

I added Antique Linen and Vintage Photo Distress Inks to the edges to finish it up.
It's a fairly simple, but fun technique.  I know what you're thinking..."That's all well and good, Cheryl, but now what are you going to do with it?"  I suppose I'll just have make a shabby chic card to go with my shabby chic panel ;D  I'll post a finished card using this panel next week.  In the meantime, check out the challenges going on this month by scrolling down and don't forget that if you enter you might be randomly selected to win your choice of a Bombsell Stamps set.  Sweet!!!

Tootles, everybody!  Have a wonderful weekend ;D

Wednesday 17 August 2011

Shabby Chic, Ms. August's Challenge

Milo Lilja, Ms.August, has challenged us to use Bombshell stamps to create a Shabby Chic project using primarily white and lace!

Here's the Wikipedia description of Shabby Chic.


Shabby chic
From Wikipedia, the free encyclopedia

Shabby chic is a form of interior design where furniture and furnishings are either chosen for their age and signs of wear and tear or new items are distressed to achieve the appearance of an antique. At the same time, a soft, minimalistic, and feminine feel is emphasized to differentiate it from regular vintage decor; hence the "chic" in the name. [1]
Contents:
1 Description
2 History
3 Origin of term

Description
Shabby chic items are often heavily painted through the years, with many layers showing through obviously time-worn areas. The style is imitated in faux painting using glaze or by painting then rubbing and sanding away the top coat to show the wood or base coats. Fabrics tend to be cottons and linens, with linen being particularly popular, inspired by old French linens. Whites and worn or bleached out pastels are favorite colours. Fabric is often stained with tea to give it the look of old fabric. Bleached and faded are terms often applied to the style.

The essence of today's shabby chic style is vintage and antique furniture with the original aged paint, or painted white (or another soft pastel color) and distressed at the corners by sanding. Antique pieces such as pie safes and jelly cupboards are popular in shabby chic décor.[2]

Popular decor items are pillows made of vintage barkcloth fabric, vintage linens, chenille bedspreads, vintage chandeliers, and anything with roses on it. It is a soft, relaxed feminine romantic way of decorating that looks comfortable and inviting. Also called cottage style.

History
The style started in Great Britain and evokes the type of decoration found in large country houses where there are worn and faded old chintz sofas and curtains, old paintwork and unassuming 'good' taste. The end result of shabby chic is to achieve an elegant overall effect, as opposed to the sentimentally cute Pop-Victorian. Recycling old furniture and fabrics is an important aspect of the look and was especially popular with modern Bohemians and artisans that made up a sidelined counter-culture movement during the 1980s when expensive quality decor became very fashionable with the upper middle classes. The original shabby chic interiors were usually considered in themselves works of art.

The early forms of shabby chic were rather grand but the style has evolved taking inspiration from many forms of decoration. These range from 18th century Swedish painted decoration, the French Chateau as well as the American Shakers where simplicity and plainness was essential.


Origin of term

The term was coined by The World of Interiors magazine in the 1980s and became extremely popular in the US in the '90s with a certain eclectic surge of decorating styles with paints and effects, notably in metropolitan cultural centres on the West Coast of America, such as LA and San Francisco, with heavy influences from Mediterranean cultures such as Provence, Tuscany and Greece.

Shabby chic is also a general term which can be used to refer to a person who is stylish rather than fashionable, where their style reflects quality as opposed to newness.[3] [4]
[edit]


Here's what the Bombshell Girls and Pin-ups have done for this challenge!


Alaine has colored Rose up and has used multiple layers of white and bling to create this card.


Mary Anne has used the Retro Cowgirl and created a shaped card


Kathi's take, using Rose's Portrait set.


Please play along by adding a perma-link to the Inlinkz below. You can enter more than once and each time you share here, on the forum, or at the Bombshell Forum at Paper Crafts planet, you'll earn one more chance to win a your choice of a free set.


Sunday 14 August 2011

One More Month -- Guest DT Call

This is a reminder!

You have one month left to complete your application to become a Monthly Pin-up (Guest Designer)!

The term is for six months and starts October 1st. This is an open call to everyone.

Applications must be received by midnight PST on September 14, 2011. Can't wait to meet you!

Click HERE to find out more!

Good luck!!!

Thursday 11 August 2011

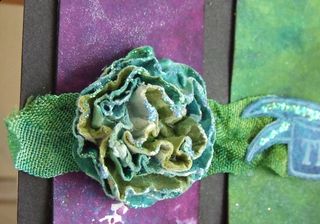
Seam Binding Colouring Tutorial

I don't know about you but I NEVER seem to have the right colour ribbon to go with a project- or if the colour is right, it's the wrong shade.
Well now you can make your own custom coloured ribbon by using cream or white Seam Binding and your ink pads or reinkers!
This can get a bit messy so work somewhere that's easy to clean up, or cover your work surface with a plastic bag.


I used my Adirondack Color Wash Sprays :


First dampen your seam binding, this makes it take the colour easier but you can experiment with it dry:


Now lay your Seam Binding out on your work surface (old chopping board for me!) and start to add your colour:


I like to add the colour gradually and build it up, plus I was going for a bluey/green shade so I wanted the colours to mix together for a marbled effect, I added a little blue:


When the ribbon was the colour I wanted I squidged the excess off in a paper towel:


and crumpled it for texture and allowed it to dry -you can blast it with a heat gun to speed up the process.
The seam binding has a lovely sheen like silk or rayon ribbon.


This time I used my Color Wash Sprays but I have used my Distress Ink pads, Reinkers and other ink pads- just experiment and see how you go. 
This is Tattered Rose Distress Ink:


Seam Binding is available in many craft stores now but if you don't feel like dyeing your own you can buy it in dozens of different colours and you can bye it by the metre, in 5 metre lengths or 25 metre reels.
Just do a Google search and plenty of shops pop up!

Happy crafting everyone!

GlitteryKatie Xxx