full screen background image

Thursday, 20 June 2013

Summertime

For this card I used:
Bombshell stamps of the sets:
The background is made with a Obsession Impression stamp
All colored with Copic markers.


Wishing you a crafty day!!
Kind regards, Stempelientje.

Wednesday, 19 June 2013

"Peek-a-Boo" Geisha Girl


Bombshell Stamps is sponsoring the new challenge over at the Desert Island Crafts Challenge Blog so today I am sharing a card I (Sharon aka Ms June) have made using one of the images from the "Peek-a-Boo Geisha" Digi Set which is being featured at DICC.


Why not get creating with your Bombshell Geisha or any Bombshell image and enter the challenge - you could even combine your entry with the current Bombshell June Sketch Challenge or my June Challenge "Be Clear" here at the Bombshell Blog!

Tuesday, 18 June 2013

Tag/bookmark


A friend of mine asked me to do a few bookmarks to her, for her to have when she gives away a book for a present. And what´s more perfect decoration on a bookmark than feather? So I made this easy bookmark for her using the feathers from the Indian Princess Digital stamp set. One of the great things with digital stamps is that they can be resized, don´t you think?

Have a nice day!
Päivi aka Ms. August

Monday, 17 June 2013

June Muse Monday: Week 3- Mermaid Anchor

Greetings! Alison here, bringing you Week 3 of June's Muse Monday. This month's set is Mermaid Anchor. Every Monday, some of the DT members will share projects made with this set. By the end of June,  you will have lots of inspiration. What's more, Mermaid Anchor will be on sale for the entire month! Here's what some of the Design Team has created for your viewing pleasure this week.


Friday, 14 June 2013

"Serendipity" Squares Card Tutorial

June 14th 2013

Sharon aka Ms June with a fun tutorial for you today!

Instructions:

NOTE: I work in Metric so my measurements are in centimetres (2 and a half centimetres is approximately 1 inch).

Step 1
The first step is to make the “Serendipity” Squares. Gather some old book pages or old sheets of music – I’ve used a kit from Vintage Page Designs along with some of my own stash. You will also need a piece of white card approx 15cm x 21cm (this will give you enough squares for several cards).


Using a glue stick tear small pieces from the book pages and glue over the white card – overlap the edges as you can trim the edges once finished. Cover the entire piece of card.


Now trim the overlapping edges to neaten and give you your base to cut the squares from.


Step 2
Prepare your base card. The size of my base card is 15cm x 21cm FOLDED IN HALF. 


Step 3
Next we need to prepare all our “elements” to put the card together – a photo below shows all the bits & pieces!
You will need a piece of another co-ordinating card that will match the base card and cut to size 9.5cm X 14cm.
You will also need to cut 6 squares at a size of 4cm x 4cm: 3 from your book pages collage sheet and 3 from another plain coloured card
Then you need 6 squares  at a size of 3.3cm x 3.3cm: again 3 from your book pages collage and 3 from the plain coloured card.
Next & most importantly you need a gorgeous BOMBSHELL STAMPS Image - I have used "Bombshell Angel" & "Fun & Flirty Digital Images" for her dress!
My image has been coloured with Copic Markers and fussy cut as I think cutting the image out gives a better effect,
You will also need a piece of ribbon or braid approx 10cm long.
A scrap piece of tulle or muslin in a matching colour.
Finally a little flower or matching embellishment, fibres, charms etc.


Step 4
I like to attach all my elements to the 9.5cm x 14cm card BEFORE I attach it to the base card as you can see below I layer all the squares (the 6 larger squares have the 6 smaller squares adhered to them) and then they are adhered to the large piece of card evenly spaced.

Note: I like to “brush” the edges of each of the squares and 9.5cm x 14cm card with a co-ordinating ink pad to add some colour and texture.


Then you can add the ribbon or braid to the bottom half of the assembled squares. Place a scrap of tulle behind the image – this looks best if it has a messy look to it and attach to the side of the card!! And finally add the flower/fibre/charm to the top.


Step 5
The last step is to attach your completed elements to the base card – and hey presto you have a beautiful “Serendipity” Card.


Variations
  1. Before cutting your book pages collage into squares you can “stamp” over it with co-ordinating colours and matching stamps. Basic floral stamps look good.
  2. You can add a sentiment instead of the flower or any embellishment.
  3. You can also make your serendipity squares from coloured and patterned paper instead of book pages.

Thursday, 13 June 2013

Rose's Portrait Tag

June 13th 2013

Hi Everyone 

It's Sharon aka Ms. June sharing a tag I made recently with my favourite stamp set from Bombshell - "Rose's Portrait". I used both the main stamp " Rose" and also the little rose poem from the set.


I used Distress Inks on the background, the butterfly border, flowers and bird are rub ons and Rose has been stamped with black ink. A few little embellishments from my stash to finish it off! I based this tag on Tim Holtz May Tag instructions and I am really happy with how it has turned out - how could it not be great using Bombshell Stamps!!


Don't forget to check out my June "Go Clear" Challenge click here for details and great inspiration from the DT. We would love to see some entries!

Tuesday, 11 June 2013

Anchors Aweigh!

Hi Everyone!

Kim here, sharing a pair of earrings I made with the Ahoy Sailor Stamp set.  I had intended for these to be a part of Muse Monday last month when the Ahoy Sailor set was showcased but I didn't get them finished in time, so here they are today!


The metal charms were stamped with metal stamps.  The anchor is from the Ahoy Sailor stamp set and was stamped in Tsukineko Memento Ink, colored with Spectrum Noir markers, and then covered in Glossy Accents.  Once the Glossy Accents was dry, I assembled them into earrings.


Have a Crafty Day!
- Kim

Note:  While nautical and cool, I wouldn't wear these earrings in the water/shower or allow them to get wet. The anchor charms are paper after all!

Monday, 10 June 2013

June Muse Monday: Week 2- Mermaid Anchor

Hello again! Alison here, bringing you Week 2 of June's Muse Monday. This month's set is Mermaid Anchor.


Every Monday, some of the DT members will share projects made with this set. By the end of June,  you will have lots of inspiration. What's more, Mermaid Anchor will be on sale for the entire month!

Here's what some of the Design Team has cooked up for you this week.

Kim

Kathi used Mermaid Anchor with a banner sentiment from Ahoy There and the fish and seaweed Stamps from Mermaid Treasure


Saturday, 8 June 2013

Name Your Poison Day

Hello Bombshell Fans! Alison here. I am happy to share with you June's Wacky Holiday. This month, it's "Name Your Poison." Here's some info about this unusual holiday as per Holiday Insights.

Name Your Poison Day is a day to make a choice. The term "Name Your Poison" is commonly used to suggest that you select among a number of options.This term has a negative connotation. The origin of this term is unknown. But, at the time, it probably referred to some unhappy choice. It is commonly used when asking someone what type of alcoholic drink they want. But, it is also used to refer to any choice of options, good or bad. For example, "Name Your Poison" may refer to selecting an ice cream flavor, a dessert choice, etc. Celebrate today by making a decision..... Name Your Poison.

And here is what some of the fabulous Design Team has created for your viewing pleasure. 

Kelli used Man's Ruin


Alison used Calaveras Fiesta and Tiki Party
 
Alaine also used Tiki Party for this tag


Thank you so much for visiting! Be sure to comment and tell us what YOUR poison is! Have a great day.

Friday, 7 June 2013

Gift Card Box Tutorial

Good Morning Everyone,

Marnie here with a box tutorial using Koi Tattoo for my focal image.  I have a lot of graduations and various gift giving events this summer so I've created this lovely box to give some gift cards in.   Just change the papers and images for each occasion and/or event.
 Start with 1 piece of pattern paper 4 1/8 x 5 1/4" and 1 piece of cardstock 3 1/4 x 5"
 Score the patterned paper at 5/8" on each side.
 Score the cardstock at 3/4" on each side.
 Fold each of your score lines.  Crease with a bone folder.
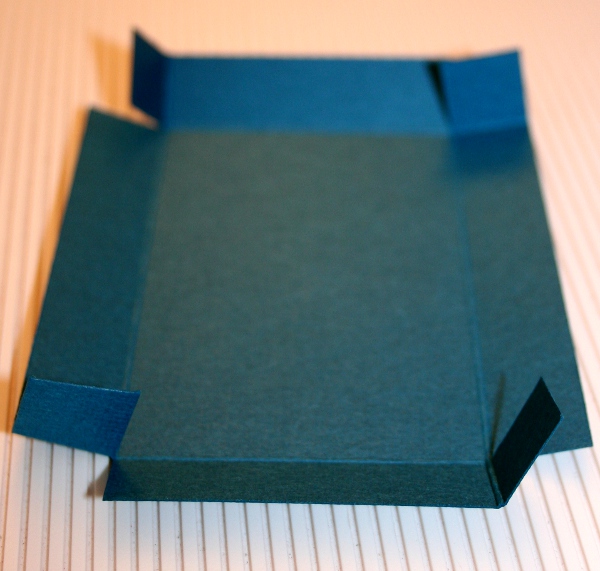
 Snip one side of each of the corners to form each box.
 Add a bit of glue on the outside of each corner square snipped.
 Adhere to inside of strip next to it to form box.  Repeat for all corners.
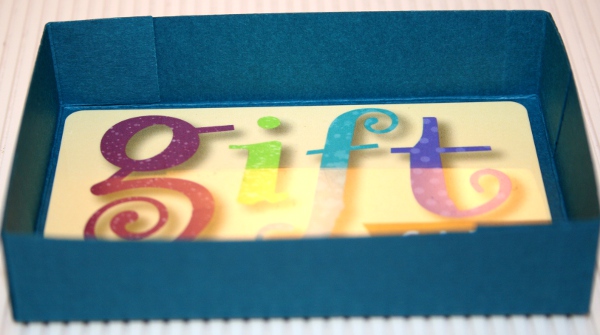
 Base of box is now complete.  Your gift card should fit perfectly.
 Repeat all the steps with the patterned paper for the lid.
 Lovely box.
 Color and cut out a Bombshell image - I chose Koi Tattoo and my Copic Markers for coloring using colors to match my papers.
 Add foam tap to the back of the image.
 Tie box up with pretty coordinating ribbon. 
 Adhere image over knot to dress up your lovely gift card box. 

Have fun creating little boxes for the perfect gift.

See You Soon!  Marnie