Hidy Ho, fellow crafty chicks and cats! Torrey here with my first-EVAH Bombshell tutorial!! I recently stepped up to our Miss April's challenge to alter something. I rushed off to my "labora-torrey" to see what I could cook up. As I slugged down my last gulp of Arizona Mucho Mango...I started musing...
"I wonder what I could do to this can?"
(insert evil, mad-scientist laughing...Mwa ha ha ha.)
Then BANG! BOOM! ZAPPP! It hit me. I could transmogrify this unassuming can into something...else! Perhaps, even into a FaBuLoUs little
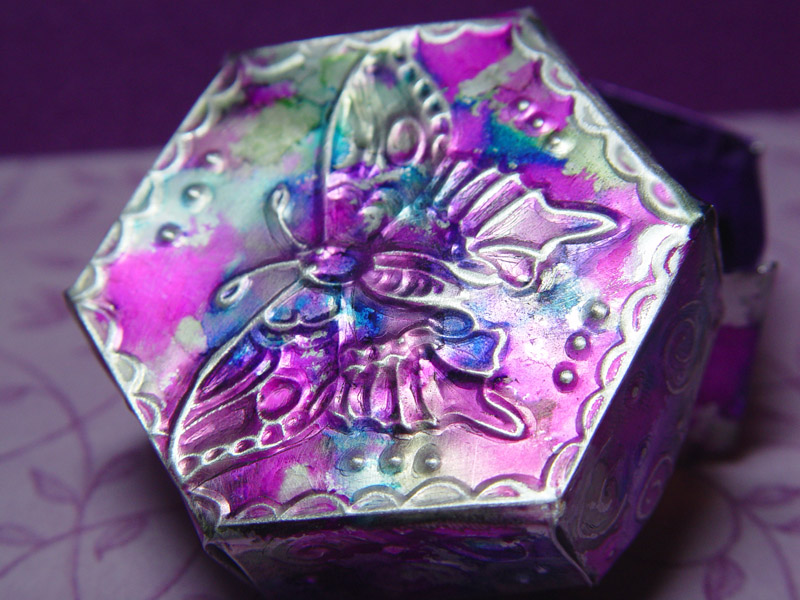
Metal Repoussé trinket box that you, too, can make!! Come on!! I'll show you how!
First, a little art history lesson (insert groans, sighs, and eye rolls).
Metal Repoussé and Chasing is a VERY OLD art form dating as far back as King Tut's time (really). It involves shaping metal into bas-relief images. Repoussé is French and means "pushed up". It's done by hammering the metal into raised (convex) areas known as "
Repoussé" and indented (concave) areas called "
Chasing". It's termed "chasing" because you actually "chase" (push) areas of the metal back into their original places once you've repousséd them. It's usually done with REALLY heavy sheets of metal, BIG honkin' hammers, various shaping tools (which look a LOT like medieval torture devices), a giant bowl of gooey pitch and lots of sweat, muscle and time. If you want to learn more...read
here.
But, I'm too lazy and wimpy to do it the "old fashioned" way. Instead, I used an aluminum drink can, a stylus, a paper blending stub and a mouse pad. Hey, it's 2012...why work HARDER when you can work SMARTER?
Here is the finished product!!
And now for the DETAILED 4-1-1. Yeah, it's a long tutorial. I am an old-school publishing girl so I do step-shots. LOTS of step shots. OH, and a great big THANK YOU to my dear husband, Jonathan, for photographing it all for me. <3
Supplies:
First off, O M G...my crafting table is CLEAN. Good thing I took a picture, it will never happen again in this lifetime. And yeah, I put my name on all my stuff. It helps it find its way home.
1. Patterns (see below for complete pattern)
2. 2-LARGE (23oz) soda cans--empty, rinsed and dried. One is for the lid, one for the base.
3. Tools:
a. Heavy Scissors
b. ruler
c. paper blending stubs (may use cotton swab)
d. styluses (may use black ball-point pen or even a pencil)
4. Stamp and solvent-based ink (I used the butterfly from Butterfly Queen)
5. Alcohol inks and applicator
6. Texture plate (if desired to add embossing--but I didn't use it)
Not shown:
7. mouse pad
8. sanding block
9. die-cutting machine (if using texture plate)
Instructions:
NOTE: You'll be working with VERY sharp, raw metal edges so BE CAREFUL.(or have bandaids on hand)
 |
| 1. Print out pattern on plain paper in desired size. Note: for mine, lid top is approx. 2 inches across (not counting sides/tabs). |
Instructions below are for the BOX LID
 |
| 2. Carefully “stab” one of the soda cans on its side with scissors. Cut straight line up from stab point to about ½ inch from top. Aluminum cans are thin and cut like buttah. |
 |
| 3. Carefully cut around can just under top to remove top. Cut straight line down from stab point to about ½ inch from bottom.Carefully cut around can just above the bottom to remove base of can. Discard top and bottom. |
 |
| 4. Trim edges of aluminum to remove any rough, jagged areas. Be careful to remove as little of the remaining sheet of aluminum as possible. This will leave you with a rectangular piece of aluminum. |
 |
| 5. With printed side of can facing DOWN, tape pattern in place over aluminum. Place aluminum on mouse pad. Trace pattern with stylus or ballpoint pen being careful not to puncture through aluminum but hard enough to leave a nice distinct line. |
 |
| 6. Remove pattern. You'll have an outline that looks like this. |
 |
| 7. Cut “box” out along outermost lines. |
 |
| 8. Flip metal piece over so that painted side is now UP. With the metal on a mouse pad, retrace all lines with stylus (use a ruler this time). |
 |
| 9. Flip cut-out piece over so that silver side is now facing up. With stylus, score a line from the point of each little corner triangle down the middle. This will create a "valley" fold that will allow you to collapse and tuck the corners in. |
 |
10. Using solvent-based ink, stamp desired image onto PAINTED surface of aluminum piece.
11. Using stylus, trace all lines of stamped image. Press hard enough to leave imprint but not so hard as to poke through the metal.
|
 |
12. Flip aluminum piece over so that silver side is UP. Carefully trace INSIDE AND OUTSIDE each embossed line. You gotta go inside and outside each line to give it the most dimension.
13. Repeat steps 11 and 12 at least one or two more times. |
 |
| 14. Using paper blending stub (or cotton swab), rub recessed (chased) areas to remove stylus lines. It's sorta like erasing. |
 |
| This is what the image looks like after 3 rounds of stylus work on front and back. I went ahead and did some freestyle stylus work on the sides and top to add more decoration (see below). |
 |
| 15. Fold box sides along scored lines. Make certain the corners are going inward toward inside of box. |
 |
| 16. Flip box over and collapse corners flush up against the sides. Fold tabs inward and down to secure corner flaps. NOTE: be CAREFUL when folding tabs down...they can break (see the one on top, it cracked). |
17. IF DESIRED, you can apply alcohol ink to top and sides of box. Let dry. I think the box would look really neat if just left aluminum color.
18. Gently sand the box with a sanding block if you want the image to stand out more.
19. Cut out and assemble box bottom, in same manner, and decorate with stylus work if desired. I didn't. I was lazy.
Here it is again!!
Thank you for taking the time to read my "lengthy" tutorial! Hope I inspired y'all to go 'speriment! You
CAN do it!!!