full screen background image

Sunday 27 February 2011

Faux Tooled Leather

My dad used to do tooled leather as a hobby when I was little. When I saw this technique it reminded me of all the items that he used to make- belts, purses, wallets, etc., then I thought how wonderful it would be with Bombshell Stamps' new western images!

I was finally able to try out the Faux Tooled Leather technique...and it's SO easy! Here is the card that I made using this technique:

Here is a quick tutorial of how to create this tooled leather look:

Faux Tooled Leather Technique:

1. Using a piece of dark brown card stock, run it through the Cuttlebug or Big Shot using your favorite Cuttlebug embossing folder or texture plate. (I ran it through 4 or 5 times to make sure that I got a good image.) Embossing folders or texture plates with larger designs work best.

2. Using a VersaMark or embossing pad and the brayer, I covered the card stock with VersaMark, being careful to cover all raised areas completely. Only the raised areas should be coated with VersaMark. You don't want to push so hard that the recessed areas are covered.

3. I then covered the card stock with clear embossing powder, shaking off any extra powder that may be in the recessed areas.

4. Using a heat tool, heat and set the powder creating the faux leather look.

I hope you'll give this technique a try. I can't wait to see what you come up with!!!

Friday 25 February 2011

Bombshell Stamps Guest DT Call!

Have you signed up to get the Bombshell Stamps newsletter? If not, you might want to sign up now to get a coupon for 20% off your order PLUS all the Bombshell Stamps news PLUS the chance to win a $100 Bombshell Gift certificate PLUS the info about the call for the next six (6) monthly Bombshell Pin-Up Girls, our name for Bombshell Stamps' Guest Design Team members! Click here to sign up now!

Just so that you know, if a monthly Pin-Up rocks her month by coming up with an awesome challenge, creating gorgeous artwork, and participating in challenges, she's invited to join the full-time team of Bombshell Girls and enjoy the perks, privileges, and fun involved!

However, here's a link to all the info you need to complete your application! The deadline is March 14th, so get busy!!!

Monday 21 February 2011

Making the Most of Your Bombshells: A Tutorial

Hello! It's Alison with a fun little tutorial. With all of my stamps, I am always looking for new ways to reinvent them. Giving them a fresh new look makes me feel like I have a new set of stamps to play with! I was going through my Bombshells, and I noticed that I could swap bodies around a bit. This is not a gory project- I promise! ;)

To start, you need Butterfly Queen and Bombshell Angel.


What we are going to do is put Angel’s head and torso on Butterfly Queen’s legs. So, you don’t need to stamp out the entire image of either. I have made two versions of this “morph,” which is why I have two of each Bombshell.


Color in the skin and the hair. I used pencils for that. You will notice that on Butterfly Queen’s image on the top right I did not color in her belly. You can click on any of the images to see it bigger.

Next, color the outfits. Please note that I completed the line across Angel’s body. She is now wearing a crop top.

On the green version of Angel, I colored her outfit in completely. I used watercolor markers for their outfits.


Cut out all 4 images. I cut around Angel’s hands so that I can slip Butterfly Queen’s bodies underneath. See my finger holding her hand up? Please note that on the blue version, I cut Butterfly Queen’s belly on a curve. Cutting it straight would have been very obvious. But the curve works with Angel’s now-cropped top. Also, I did not keep the upper triangle of the green version of Butterfly Queen (even though I had colored it in).


And here they are in their new bodies and outfits! See? I told you this wasn’t going to be gruesome! They each have new, totally different looks to them!


Here they are on their cards. I love their new looks!


I hope you’ve been inspired! I would love to see you try this technique. What other ways can you transform your Bombshells? I’ve got some more up my sleeve…but that’s for another time! :) Have a great day!!!


Wednesday 16 February 2011

February's Color Challenge!

Ms. February, Dawn Knight, set this month's challenge.

Here it is:
Howdy y'all!!! I am so excited to be Miss February!!! I chose a fun color challenge and made a neat project using one of my favorite Bombshell stamp sets, Retro Cowgirl. (They are really all my favorites... but don't tell the Cowgirl... she is PACKIN'!)

Anyway...I chose the color combo of Red, Turquoise and Kraft.I think that these colors look great together and really look awesome for this Little Cowgal!

I made this fun polyshrink plastic Bracelet for my little bombshell in training and she even got to help, We both thought that was pretty awesome!

I stamped the image onto white polyshrink with black StazOn. I roughed the plastic up first with a sanding block. Then me and my darling used colored pencils and added the fun colors of red, turquoise and kraft. I drew a heart on the skeleton; he just seemed to need it. I added dots around the images in the challenge colors as well. Then we baked them and attached them to the bracelet and here is my creation!

Thanks for checking in and be sure to play along!


Here's what she made to inspire us to play along!


Kathi's Sketch & Color Challenge card:


Sunday 13 February 2011

Our "Inner" Bombshell

The Bombshell Design Team was challenged to create a project to represent their “Inner Bombshell”. It could be sexy, it could be sultry...they could make it however they “see” their inner Bombshell! Of course, the DT did NOT disappoint! Check out these fabulous projects!


Cheryl
(Cheryl's card is just like her in that it looks sweet at first until you catch the edgy wit. Plus, there's a skull on it and everyone knows that sends her over the moon.)


Katie
(Katie is multi-faceted AND multi-talented and is showing the true Gemini that she is…
Make sure to check out the wonderful masking tutorial that Katie posted!)


Alaine
(Alaine took this challenge to a whole 'nother level! It's amazing what
you can do with an old anatomy catalog!)


Alison
(Alison truly IS a retro Bombshell and she has the pictures to prove it!)


Mary G.
(Mary sees her Inner Bombshell as a gorgeous belly dancer who shakes
what she's got- think Shakira!)


Dawn
(Dawn is a mother to 2 small children...time is not her own and everything she does she
does for them... but still manages to look hot... she’s a MOMshell!)


Kathi
(Kathi's inner Bombshell is a thin and gorgeous rocker who's looking hot in
her leather and studs!)


Kelli

(Kelli's inner bombshell is a QUEEN of everything!!!)


(Anita's inner Bombshell is as free as a bird and a scrapper at heart)


Mary H.
(Mary's Inner Bombshell is a rootin' tootin' Western Gal
who does it all in style!)


We hope you will be able to discover YOUR inner Bombshell with Bombshell Stamps!! When you do, make sure to post your creations on the Bombshell Gallery for all to see!

Wednesday 9 February 2011

February Sketch Challenge!

Here's the sketch!


Here's my take on the sketch, which also works for the "Love is in the Air" challenge over at Splitcoast! Yay. Efficient me. Ha!


Cupid is from Bombshell's most popular stamp set, Bombshell Angel. I masked off the banner that said "Lil Angel". Cupid was colored with Copic markers and touched with a hint of chalk on his cheeks (both sets <--- :D). Glaze pen was added to his arrow for dimension and to act as a resist to the clouds that were sponged. His arrow is shooting at the sacred hearts from the Sacred Heart Art set, which were also colored with Copics. The little flame was colored with glitten pen. You'll notice that I tipped the sketch on its side. I'm cool like that.

Feel free to play along and create a Bombshell project using this sketch. Share it on here and in the forum! Link it below for a chance to win a fabu prize!


Tuesday 8 February 2011

Meet Ms. February -- Dawn Knight!

It's time to meet our February Pin-up, Dawn Knight!

Here's her interview!

1. Brief info about yourself, including your name, where you live, your family (if you want), etc.
My name is Dawn Knight. You can call me "She Who Must Be Obeyed," Just kidding! I live in North Carolina with my David, The Super Hubby; Ava, my six year old diva; and Jakey, the sunshine of the Knight residence, our 17 month old son.

2. How long have you been stamping and/or crafting?
I have been stamping six years and crafting since I was seven and my mother taught me to crochet. The funny thing is that I knit now and cannot remember how to crochet! But let me tell you, I will NEVER forget how to stamp! I love it!

3. What are your favorite Bombshell sets and why?
I love Homeward Bound -- the ship reminds me of my precious momma and daddy. Daddy was in the Navy for 20+ years and momma says she was in too because they traveled the world together with my four older brothers and sisters. When he retired from the navy, my sister and I were born, so we traveled mostly in the states. Seeing my parents' faces light up when they talked about their adventures always made me smile.

4. What kind of projects do you like to do?
I really love to make cards. They are like little pieces of art. I really want to get more into altering things. I do like to make treat holders because I love a good treat now and then!

5. What are your favorite coloring mediums?
Copic markers! Of course they should be! My set cost more than my car! ha ha! But they are amazing. I am really getting back in touch with my watercolor crayons and I love to mix things together to create other types of coloring mediums, like Pearl-ex and Crystal Effects or reinkers and Shimmerz.It is like a science lab in my craft room!


6. Describe your crafting "style".

Caveman -- totally caveman! I make a mess when I am crafting and I don't like to follow directions or patterns. I just let the creativity flow and take me where it takes me!

7. Describe your crafting process. Do you start with a stamp set? A sketch? A technique you want to use?
I sometimes cannot sleep, so I think about stamping and I will make up card sketches or color combos. Then I get a stamp set in my head that would work perfectly for those ideas. So I would say that my process is "OCD meets crafting!"

8. Do you have any other hobbies?
I am a knitting freak, I love to quilt and sew and really I will try
anything creative!

9. Free for all including little facts, etc. about you.
• I have a crazed fascination with abandoned asylums and recently spent the night in one.
• I am terrified of clowns. I mean like PHOBIC!
• I love birthday cake and think it is the best dessert in the world.
• I love electronic gadgets though I will tell you I can take them or leave them.
• My oldest brother is 20 years older than me -- from the same parents.
• I have been a hairdresser for 23 years, but amazingly I don't look a day over 29!
• I have two Jack Russell terriers, but I would love about eight of them. They are the best dogs, they are just like me!

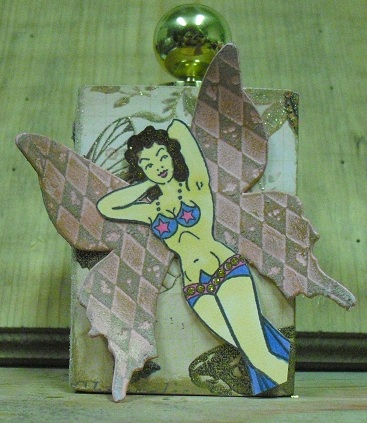
Now that you've learned more about Dawn, here are three of her fabulous Bombshell creations!


After seeing Dawn's artwork, visit her blog to be treated to more eye candy!

Wednesday 2 February 2011

Multi Masking Technique-going BIG on Bombshells!!

Mary G has challenged the Bombshell team to come up with a Bombshell project that reveals their inner Bombshell!
As a Gemini I find I have two distinct sides to my personality and my crafting! Sometimes I'm neater and nicer and like to go with pretty, glittery and happy. Other times I'm inky, grungey, showing a dark sense of humour and loving skulls and tattoos!
So my Bombshell project is kinda my Gemini self!
I layered multiple Bombshell images by using masking. 
First I stamped the Bombshell Bride onto my card with Memento ink.
I stamped her again onto some scrap paper and cut her out to make a mask. A little repositionable Hermafix on the back of the mask and placed it over my stamped image:


Next I lined up where I wanted my second stamped image and stamped her over the mask:


Then I had my two main Bombshells 'Lucky Bride and Butterfly Queen' next to each other:


I stamped Butterfly Queen onto scrap paper and cut her out so I could make a mask for my second stamped image, I could then start stamping over the two Bombshells without making a mess of them. Here are both Bombshells, masked with some of the next layer of stamping going on:


As I progressed I added more masks so that I could over stamp more of the card:

Not all the masks were stamped on scrap and cut out- for smaller images, sometimes all I needed to use were strips of paper to protect an image below:


Once all the stamping was done and the masking removed the card looked like:


The final job was to colour the images in and add some extra images with 3d foam to make the pop off the card


I really enjoy this technique as you get a really dense layered look but you can still focus on the main subjects of the card. It's quite involved but i find it quite relaxing and my 'DH' commented on how quiet the colouring in kept me!!

I've used this technique before:


and if you leave the images uncoloured apart from sweeping with Distress inks it forms a cool background:


Happy Crafting!
Love,
Glittery Katie xxxx