full screen background image
Showing posts with label Butterfly Dreams. Show all posts

Wednesday, 20 August 2014

August Color Challenge


It's time for the next Bombshell Stamps Color Challenge! This month, like all of the others, the color palette is from Design Seeds. 


To play, you need to use at least 3 of the colors from the palette (the more the merrier, though!), and you can only use black, white, and skin tones additionally. I can see many, many of Bombshell's great projects working for this set of colors, can't you? Here's what the DT came up with.


Wednesday, 2 April 2014

Ms. April's Challenge

Bombshell's Ms. April, Betsie Golden, has set this month's challenge which is "Junk It!" Use junk mail, packaging, bottles, and boxes and upcycle it with your Bombshell stamps.

It is now spring and warm in my part of the country and I wanted to make something that reflects that. I used the "Hawaiian Girl" stamp set for my project. As I was going through my junk mail this page in my daughter's catalogue (she is 11 and loves clothes with animal print and anything blue, but that has nothing to do with the challenge. It is just useless information.) jumped out at me.
 The colors, style and tropical feel inspired me to use this as the base of my project. Originally I was going to make a card, but I remembered that I had a junk drawer in my craft room full of cool boxes that I have collected over the years. I found a box that originally came filled with lovely chipboard. I just could not get rid of the box because I knew one day it would make a darling shadow box, so it has waited patiently for about 7 years to be used.
 Between my two pieces of junk I came up with this little wall hanging using Bombshell's Hawaiian Girl set.

 I am not quite sure what I am going to do with it, maybe send it out as happy mail or display it in my house.

Make sure you upload your take on the challenge and post your link in the comment section :-)

Kathi using the Butterfly Dreams set and recycled corrugated cardboard.


Kim using Dead Necessities & a recycled chipboard box and old spiderweb confetti.


~~~~~~~~~~~~~~~~~~


Saturday, 22 March 2014

Still time to Play Bombshell Bingo!!!!

Hi guys. I hope you are having a great weekend. I was travelling earlier this month and didn't have time to get in my project for Ms. March' Pin Up Challenge. It was a game of Bingo and I LOVE Bingo. SAD FACE.

But here I am with my BINGO combination.


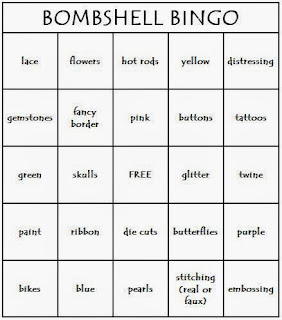
The Bingo card is below:


I went diagonally! My first element in the B column is Lace - I cut a piece of black lace and wound it up to make a flower. To hold it in place I added the crystal as the center. The I column is the fancy border. I used a Martha Stewart edge punch I have. I like the little bit left on the ends. To me it gives it a bit of a finality.  Then I got a Free Space - because WHO Doesn't like Free. :-)

Then G - that is Butterflies - I used Butterfly Dreams for the two butterflies I used. Because I knew that I was using Black and white predominantly I thought they needed to be very colorful. So I used RV0x, BG0X and YG0x series to color them. The final square in my diagonal bingo was embossing. For this I used Versamark on the inside of one side of an embossing folder. I then very carefully placed my paper and then ran it through my Embossing tool... Once done I quickly added clear EP on it and heat embossed it. It gives a black DP like look to it with the matte and shiny making it look really cool.

OK... So now why don't you try your hand at Bombshell BINGO. You do not have to use a Bombshell image to enter, and you get a chance at wining some!

Til later - TATA!

Alaine

Wednesday, 15 January 2014

January's Sketch

Here's January's sketch.


Feel free to flip it, flop it, and make it your own. Use your Bombshell Stamps to be eligible to win a fabulous prize!


~~~~~~~~~~~~~~~~~~~~~~~~~

Friday, 22 November 2013

TGIFF -- Clouds Tutorial!

Greetings! Today I'm going to share a tutorial that will show you two of the ways that I use my Copic markers to create a cloudy sky behind my Bombshell stamps.

I've chosen to use the Butterfly Dreams set, mostly because I couldn't decide which pin-up set to use.

Go grab a cuppa and let's get started!


I've used the following supplies:
  1. The Butterfly Dreams rubber stamp set.
  2. Tuxedo Black Memento ink
  3. Nestabilities Grand Labels 4 die
  4. Memory Box Puffy Clouds Die
  5. Post-It Notes® or Judikins Eclipse Tape
  6. Copic markers or other alcohol markers
  7. Patterned papers: I've used papers from old Ambrosia and Marjolein 6x6 pads by Basic Grey
  8. Cardstock: Neenah Classic Solar Crest 80# (stamped panel) and Bazzill Basics
  9. Black Soot Distress ink
  10. Various other die cuts
Step One
Stack several Post-It Notes® together, line up the dies over the sticky areas of the stacked PINs and die cut the three different sizes included in the Puffy Clouds set. Do this step several times. You can always use the spares! Separate the notes and set aside for now.

Steps Two, Three, Four

Choose your butterflies from the Butterfly Dreams set and stamp them as desired using Tuxedo Black Memento ink onto whatever Copic-safe cardstock you prefer. Use the metal die as a placement guide. I used the same two butterfly stamps in various configurations, which you'll see later. Much, much later.

Color the butterflies as desired, position the metal die over your stamped colored images and die cut. I just got the new Sizzix Magnetic Platform and it rocks. Prior to that, I've used Repositionable Scotch Tape® to hold the die where I wanted.

Step Five

Take the platform out of the machine, keeping the die-cut, stamped, colored panel within the die. If necessary, gently remove the tape, taking care to keep the die in place. Take your C0 or equivalent and lightly trace around the inside of the die. Be careful because sometimes the inner edge of the die will be a bit jagged, which might snag your marker nib! Remove die and clean with hand sanitizer. Put the die and platform away! You must keep your work surface tidy or the Stamping Police will come and arrest you!

Here are all four of my stamped, colored, die-cut, and outlined image panels.

Step Six
Position your Post-It Note® clouds as desired. Play around to find a layout that you like. Be sure to use the sticky side to keep the clouds in place so you can do...

Step Seven
Using a C00 (or equivalent) marker, lightly trace around the clouds. If you have overlapping clouds, gently lift the part that overlaps, and trace it so the cloud appears to be in front.

Step Eight
Use your C0 marker (or equivalent) and make the clouds' outlines a bit bolder. Start adding some curvy lines and squiggly doodles to the inside of the cloud. Go over the C0 with COO or your Colorless Blender to soften some of the lines.

Step Nine (are you bored yet?)

Go over the edges of the clouds with a blue marker (I've used B21). Outline each cloud and the edges of the butterflies that touch the "sky" with the blue marker. Then start to fill in the "sky" using horizontal strokes. It might look streaky, but you can always add additional ink and/or lift some with the blender.

Step Ten
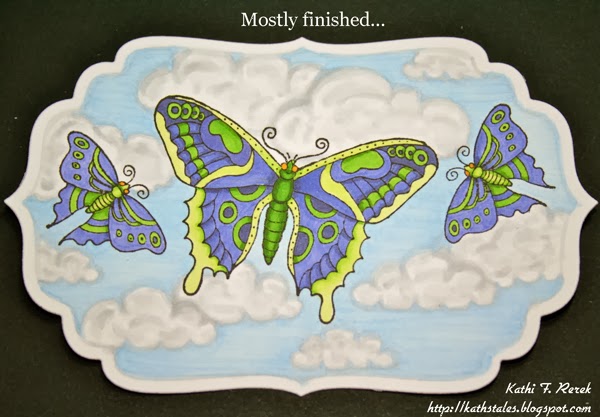
The above is mostly finished. The last step of this process is to go over the image, darkening or lightening the sky as desired and touching up the clouds.

Finished Card

Did you think we were done? Nope. Not yet. Go refresh your coffee and/or tea. Or get yourself a leisure beverage 'cause there's more yet to come!

Variation on a theme or Clouds, the sequel

Repeat steps one to five (stamp, color, die-cut, and trace the interior edge of the die-cut). 

Clouds, the sequel -- Step Six

Now free-hand draw in some clouds using your CO0 (or equivalent) marker. Then follow the rest of the steps as above. The only real difference is that you drew in your own clouds! Yay.

Hand-drawn clouds using C00, C0, B0000, B000 markers (and blender)


Finished Card with Hand-drawn clouds -- also uses Banner Sayings rubber stamp set!

You can add pink, purple, and other colors to the clouds to reflect the sky. You can also create a cloudy night sky! The possibilities are endless! 

Card Three

Card Four -- I was channeling my inner hippie.


BTW, if you've made it this far, pat yourself on the back. And now you know why I rarely do tutorials...


Sunday, 8 September 2013

Playing along with Ms September's Challenge!

Ms September, Jenn Cochran issued a 'Layer It Up' challenge to use at least three layers, paper, paint ink, ribbon etc on our Bombshell project!

I was inspired by Jenn's challenge to create an altered art project with a tinned fish tin!!
After washing the pilchard tin a few times to ensure it was thoroughly clean I painted the tin with acrylic paint and patterned paper and lined the inside with patterned paper.
For the front of the tin I used a Decorative Label Eight Spellbinder die cut in blue paper which I then cut an oval in the middle of- I stuck this to the front of the tin.


I used a small butterfly and the sentiment from Butterfly Dreams & the Moth from Butterfly Queen- stamping them and colouring them with Distress Inks and Distress Markers for a soft look.
I cut out the two butterflies and mounted them on foam tape and stuck them in the tin.
I added a pin to each butterfly like the old fashioned butterfly collections.


I added some leaf ribbon, pearls and Stickles glitter plus I stamped the 'Butterfly Dreams' sentiment onto kraft cardstock and added this to the front of my butterfly tin.


Hope you enjoyed Ms September's challenge!

Happy Crafting!
GlitteryKatie Xxx

Tuesday, 6 August 2013

August's Sketch Challenge


Here's August' sketch!


Feel free to flip it, flop it, and make it your own. The only rule is to use Bombshell Stamps when creating your project!!!

Susie using Man's Ruin


~~~~~~~~~


Saturday, 6 July 2013

July's Sketch Challenge

Here's July's sketch!

Feel free to flip it, flop it, and make it your own. The only rule is to use Bombshell Stamps when creating your project!!!


Alaine and Kelli were apparently on the same wavelength this week 


~~~~~~~~~~