Bombshell Stamps has a great variety of gorgeous Bombshell gals that are always ready for a party. Happy New Year's Eve to everyone and hope that you have some fabulous festivities planned to bring in 2014.
Tuesday, 31 December 2013
Monday, 30 December 2013
December Muse Monday -- Week Five!
During December, we will be showcasing the Speed Shop set, which will be on sale throughout the month!
Be
sure to visit us each an every Monday for some fabulous inspiration
from some of our talented team. Here are this week's projects.
Here's the set!
Friday, 27 December 2013
Bombshell Stamps Fabulous Friday Tutorial - Washi Tape
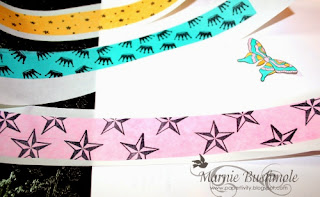
Hello Hello, Marnie here! I love creating my own Washi Tape and the Bombshell Stamps make the perfect tools to create coordinating tape to go with any of our stamp sets. With some colorful tissue paper, stamps, permanent ink and a sticker maker you can make your own as well.
First stamp each strip of tissue with any of the stamps you choose. Here I am using the star from Tattoo Backgrounds on pink tissue paper.
Also stamp the star background from the same set (Tattoo Backgrounds) and stamped the yellow tissue paper.
Then stamp the crown onto the turquoise tissue paper from Butterfly Queen.
Now run each strip of tissue paper through the Xyron sticker maker or cover the back of each piece with a dry adhesive.
Take a butterfly from Butterfly Queen and stamp and color the image. I did fussy cut it out so I can bend the wings up later.
Cut down each strip to fit onto the card front and punch a fishtail on each end with a square punch.
I layered the strips onto the card and added the butterfly. I then used a Thank You sticker as a greeting. I hope you love creating your own Washi Tape to embellish your cards.
Santa's Harley
It's after Christmas. Santa's made his world wide dash to deliver presents. Now it's time for his break. I can't think of a better way to relax than to take a spin on two wheels. So here's one more holiday card featuring Bombshell Stamps' Vintage Motorcycle
Here's an angled shot to show some of the dimension. There are two pop up layers.
And the inside of the card.
Supplies:
Ink: Memento (Tuxedo Black)
Coloring: Copic markers
Patterned Paper: My Mind's Eye
Cardstock: Neenah (white), Stampin' Up (Cherry Cobbler, Always Artichoke, and Naturals White)
Accessories: Stamin' Up ribbon
Tools: Martha Steward border punch (used on the inside)
Wednesday, 25 December 2013
We wish you a Bombshell Christmas!
Merry Christmas to you all from the Bombshell Girls and Pin-Ups!
We wish you a holiday filled with joy, jingling, love, laughter, and loads of (Bombshell) loot!
Happy Christmas Everyone,
The Bombshell Design Team!
We wish you a holiday filled with joy, jingling, love, laughter, and loads of (Bombshell) loot!
GlitteryKatie used Man's Ruin
from Monika's archives using Bombshell Angel, Holiday Accessories, and the Bombshell Angel Die Cut File
From Monika's archives using Speed Shop
From Monika's archives using Vintage Motorcycle
From Monika's archives using Custom Choppers
From Monika's archives using Vintage Motorcycle
From Monika's archives using Harley Bikes
From Monika's archives using Harley Bikes
Kim using Holiday Accessory
From Kim's Archives using Holiday Accessory
Happy Christmas Everyone,
The Bombshell Design Team!
Monday, 23 December 2013
December Muse Monday -- Week Four
During December, we will be showcasing the Speed Shop set, which will be on sale throughout the month!
Be
sure to visit us each an every Monday for some fabulous inspiration
from some of our talented team. Here are this week's projects.
Here's the set!
Thursday, 19 December 2013
Winter Rose
I've been feeling in need of glitter lately and I went to town on this tag with the beautiful Rose's Portrait.
I stamped her in soft icy blue ink and clear embossed it then coloured her in with light blue and lilac pens, I used Spectrum Noir IB1, IB2, IB3; BT1, BT2, BT3 and HB1, HB2, HB3.
I created the tag background with blue and purple shades of Distress Ink with a smudge of Silver Dauber paint.
I used the Sizzix tattered branch die and Spellbinders snowflakes.
I added Stickles here and there and some white netting through the tag!
Now I am covered in a layer of glitter and feeling very festive!
Happy Crafting!
GlitteryKatie x
Monday, 16 December 2013
December Muse Monday -- Week Three
During November, we will be showcasing the Speed Shop set, which will be on sale throughout the month!
Be
sure to visit us each an every Monday for some fabulous inspiration
from some of our talented team. Here are this week's projects.

Happy Crafting!
Xxx
Here's the set!
(rs94, dd83)
and four cards from Monika's archives....

Happy Crafting!
Xxx
Saturday, 14 December 2013
Holiday Party Bombshell
I haven't been posting for a few weeks as I went out for carpal tunnel surgery. I'm still heeling, but still functioning with my right hand while coddling my left hand. So I made a clean and simple card to keep things easier. I really like CAS cards and often aspire to make CAS cards, but don't always achieve that aspiration. Hopefully I did this time. So here she is.... my Holiday Bombshell.
This Bombshell Angel is stamped with Rich Cocoa Memento ink and colored with Copics. The dress is cut using my e-cutter with MTC software using the Bombshell Clothing digital die cut file.
The Bombshell's Santa hat is from the Bombshell Stamps Holiday Accessory set. It's stamped, the red is colored with Copics and the fuzzy white stuff is this great medium called Liquid Applique that puffs up when heated with a heat gun.
The designer printed papers are from My Mind's Eye and Recollections. The silver layer is Canson and the white cardstock is Neenah with a Hammermill white cardstock card base. Some dimensional foam tape is used to pop up this gorgeous gal from the card base. Lastly, the embossing is created using an embossing folder by Darice.
Friday, 13 December 2013
Fabulous Friday Tutorial-Seam Binding
Hello Glittery Katie here- this week for the Fabulous Friday Tutorial and I shall be sharing a technique with you that I use a lot! I love making tags and I like to finish them off with a colour co-ordinated ribbon....
I use seam binding which is has a texture like a silk ribbon, I buy 5m packets of seam binding in cream or white so I can colour it however I want.
In this case I wanted to colour co-ordinate my ribbon with my wintery blue tag......
...I used Distress Stain and ran the inker over my seam binding ribbon but I didn't want a solid colour....
...so I left patches of ribbon uncoloured.....
I then sprayed the ribbon with some Perfect Pearls spray also in blue....
...this added a lovely pearly twinkly to the ribbon.
I then squidged the ribbon up as I wanted a crinkled look and heated it with my heat gun....
...I have no patience and wanted to speed the drying process up- be careful and don't over heat your ribbon!
The ribbon now is crinkly and has a lovely patchy, vintage look...
It's a simple technique but a coloured ribbon can really finish off a project!
Happy Crafting!
GlitteryKatie XxX
I use seam binding which is has a texture like a silk ribbon, I buy 5m packets of seam binding in cream or white so I can colour it however I want.
In this case I wanted to colour co-ordinate my ribbon with my wintery blue tag......
...I used Distress Stain and ran the inker over my seam binding ribbon but I didn't want a solid colour....
...so I left patches of ribbon uncoloured.....
I then sprayed the ribbon with some Perfect Pearls spray also in blue....
...this added a lovely pearly twinkly to the ribbon.
I then squidged the ribbon up as I wanted a crinkled look and heated it with my heat gun....
...I have no patience and wanted to speed the drying process up- be careful and don't over heat your ribbon!
The ribbon now is crinkly and has a lovely patchy, vintage look...
Now the ribbon is dry you can add some more colour if you want.
You can also colour the ribbon with ink pads, paints (which makes the ribbon a little stiffer but still works well!), alcohol inks or alcohol pens. It's a very versatile ribbon and it's fun to experiment.
Finally I trim the edges of the ribbon with a diagonal cut to stop it from fraying- although that can be a good look....
...and I thread it through my finished tag..
Happy Crafting!
GlitteryKatie XxX
Subscribe to:
Posts (Atom)


