full screen background image

Monday, 27 May 2013

Muse Monday: Week 4- Ahoy Sailor

Greetings, Bombshell fans! Alison here to welcome you to the 4th Muse Monday featuring the Ahoy Sailor set. If you are new to Muse Monday, here's the scoop. Each month, I choose a set for your awesome design team to feature. And each Monday, some of the DT shows off projects using just that set. By the end of the month, we will have shared lots of fantastic projects to inspire you. And...check this out....now you can get the featured set ON SALE! For the entire month! So if ya like what you see, be sure to snag the set while it is on sale.

Without any further ado, here are the projects for this week, featuring Ahoy Sailor.


Why not look back at all the fabulous projects from our DT this month?
Week 3
Week 2
Week 1

We hope you've enjoyed this month's Muse and hope it's provided you with lots of inspiration! Don't forget that June is just days away and we'll be back on Monday with a new stamp set to tempt you with!

Happy Crafting!
Alison, Stempelientje & GlitteryKatie

Sunday, 26 May 2013

May Wacky Holiday: Sunscreen Protection Day!

We love our Wacky Holidays here at Bombshell Stamps-it's a mine of inspiration!
May 27th is Sunscreen Protection Day just ahead of the summer and holiday season.   It educates and brings awareness to the importance of using sunscreens to protect yourself and your children from harmful UV rays from the sun. So remember to slap to on the sun screen!

See how the Bombshell Design Team has been inspired by Sunscreen Protection Day!


Sharon aka Ms June using Muertos Doll


Alaine Using Cherry Bomb

And inside. :-)
Michelle using Bucking Bronco & Wanted


Happy crafting everyone!!

The Bombshell DT x

Saturday, 25 May 2013

Patriotic Showgirl

This beauty is ready to celebrate Memorial Day in all her red white and blue glory.  Just think of her as one of the showgirls traveling the world to entertain our loyal troops. 

Featuring Butterfly Queen


Credit for the sketch goes to Retro Sketches (rs64).
Stamps: Bombshell Stamps (Butterfly Queen)
Ink: Memento (Rich Cocoa)
Coloring: Copic
Papers: My Minds' Eye and Jillibean Soup
Cardstock: Stampin' Up & Neenah
Ribbon: Misc.
Accessories: misc Bling

Friday, 24 May 2013

Butterfly Dreams Journal


Hello Lovelies, Kelli here with a tutorial for you.  I love journals as do a lot of people, especially my daughters friends.  I  found ourselves in need of one such journal last month and decided to make one.  Here is how I did it!

Supplies Needed:105
Molding supplies of choice, I used Amazing Mold Putty
Clay of choice, I used paper clay
Item to alter, I used a journal from the dollar store
Decorative paper napkin
Paint colors of choice, I used Golden Brand Quinacridone Magenta, and Cobalt Turquoise
Rub –n-buff, antique gold
Fluid Matte Medium
Gesso
Stamp set of choice, I used Butterfly Dreams

Step 1: Following the directions on your molding compound make molds of your stamps.
106107

Step 2:While your molds are setting up, Gesso the cover of your item, if your item is one light color you can skip this step.
108109

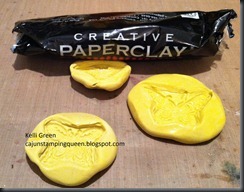
Step 3:  Once your molds are done use clay of choice to make your pendants.* 
112113

Step 4:  Separate your napkin, make sure to keep your non decorative layers for next months tutorial.  My napkin had 2 non decorative layers, yours may have only one… Using the matte medium adhere the napkin to the outside of your item, journal for me. 
110
Step 5:  Once your clay pendants are dry paint them.  When your paint is dry apply the rub-n-buff to bring out the details.
130131132
Step 6:  Adhere your painted pendants to your item, add a pen and you have a pretty little gift all ready to go.  (do not be like me and lose the pen that came with your journal if it has one)

* I found it helpful to make several pendants at one time so that I had some on hand for future unexpected gifts.  Which  I used recently for another gift… Also keep in mind the drying time of your clay, it takes paper clay 3 days to dry completely!*


Monday, 20 May 2013

May Muse Monday - week 3 : Ahoy Sailor

Welcome Bombshell friends! It's the third  Monday of the month, so another Muse Monday. As you probably know, each month a different Bombshell Stamps set is chosen to be featured here on the blog. And each Monday, different members of  the Design Team feature projects using the chosen set. By the end of the month, you will have lots of fabulous ideas and inspiration for that set!  This month's set is Ahoy Sailor.

Sunday, 19 May 2013

Metal time!

I love working with metal and stamps!


Here is my take on Ms. May's cool challenge which was to use: the colors - Grey & Jade, Gold, Silver, White and the textures - Dry Embossing, Scrolls, Scallops, Satin Ribbons, Metallic, Glitter.


I managed to use: metal, dry embossing, satin ribbons,scrolls, silver, jade and white!


First I covered my tag in foil tape and embossed around the edges and pressed a pencil into to to form rivet holes so it looked like metal plates fixed together.

I painted jade paint all over it, left it for a couple of minutes then wiped it over to remove a lot of the paint.
When the jade paint was dry I added a spritz of white paint to calm the jade down.


For the motorbike I stamped Live to Ride onto a square piece of foil with Staz-on ink then I used an embossing tool to go around the stamped image.

When I had embossed around the image I ran a textured wheel tool around the edges of the foil to give it a machined look.
To give an oiled look I wiped Staz-on around the edges of the foil square and the jade tag!
I added a couple of Tim Holtz Idea-Ology gears and tags to the tag and coloured some satin ribbon with Jade and silver paint and I was done!
Thanks to Marnie for a great challenge!

Happy Crafting!

GlitteryKatie xxXXXxx

Friday, 17 May 2013

Fabulous Friday Tutorial ~ Glossy Fridge Magnets.

Good Morning Bombshell Babes and welcome to another Fabulous Friday Tutorial from me Susie
Today I am going to show you how I make...
 Fridge Magnets.

To start you will need:
Magnetic Sheet.
Kraft Cardboard.
Cardstock.
Stamping Card.
Glossy Accents
Dies.
Black Alcohol Ink Pad
and your choice of Alcohol ink Pens


First Stamp and colour your chosen desgin using Alcohol Ink Pad and colour using your Alcohol Ink Pens.


 Using a oval die cut out ovals from the Card, Cardboard and Magnetic Sheet.


{Please forgive the fuzzy photo}
Stack you pieces as follows 
Magnetic, Cardboard and Cardstock


Run a Black marker pen  around the edge of the stacked ovals to hide the messy edge.


Mount your coloured stamped image onto the the cardstock top.


and then finally cover the whole image and rim of cardstock with Glossy Accents.


Once dry your magnets should look like these!


I hope you enjoy having a go at this tutorial!


Thursday, 16 May 2013

Breaking news!!!

May's Muse Monday's featured set, Ahoy Sailor is on sale for the entire month! Click HERE to check out the sale!


In fact, going forward each month, Muse Monday's featured sets will not only be showcased with artwork by our talented team, it will be on sale!

Yahoo!!!

Monday, 13 May 2013

May Muse Monday - Week 2 : Ahoy Sailor

Welcome Bombshell friends! It's the second  Monday of the month, so another Muse Monday. As you probably know, each month a different Bombshell Stamps set is chosen to be featured here on the blog. And each Monday, different members of the Design Team feature projects using the chosen set. By the end of the month, you will have lots of fabulous ideas and inspiration for that set!  This month's set is Ahoy Sailor.


Friday, 10 May 2013

Fabulous Friday Tutorial - it's getting fishy.....


Today I am showing you a great and easy resisting technique.
Needed:
Bombshell stamps - I used stamps of the Lotus Garden set.
 Tag, Distress ink, StazOn Jet Black ink, white crayon, sponge.

Stamp with the StazOn ink on the tag

'Color' the fish and some rings with the white crayon, those bits will resist later

Sponge the tag

Buff up the area's were you did color with the crayon and it will then look like this:

Sponge with black around the  border to finish the tag of.
 
here is another finished one.

Have a go, it is really not difficult at all!
And of course: have fun!!

Wishing you a crafty day,
Stempelientje