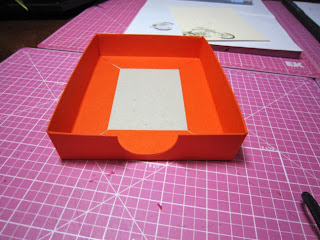
The gift giving season is just around the corner. Sometimes it's just a simple little gift that can make someone's day. Here's an idea for how to make a custom note card holder. Yes, I said custom. You can make any size you want, any color you want, and decorate it to your tastes (or to the liking of the gift recipient.
I started with the notecards. I decided that I was going to take a simple path and just use quarter sheets. So that measures 4.25 x 5.5 inches. And I decided to decorate my notecards with a simple motorcycle image that is running off of the side of the note.
No coloring.... just keeping it simple. That stamp is gorgeous enough on it's own.
So now to the measurements and mechanics. I drew up the design for my box. I suggest you do the same as you'll use it as a reference during construction.
The Base
I gave the base a 1/8 buffer so the note cards would fit snug, but with enough room to breathe. My base is 5 5/8 and 4 3/8. To recap on the measurement of the base (or center of the sketch below). My note cards are 5 1/2 x 4 1/4 inches. Adding 1/8 inch to each side, I get the 5 5/8 and 4 3/8.
The Sides
I wanted the sides to be 1 inch tall. Tip: pick an easy increment that is on your scoreboard. The side panels will fold up, over, and then back into the base. That's three sections that will each need to be 1 inch tall. The first section will need tabs to fold under the side walls.
Size of paper to cut.
Adding my base and then the sides together, I get an overall size of 10 3/8 x 11 5/8. Whew, that's just a bit smaller than a 12x12 sheet and I didn't need to reconfigure the size at all.
I used a sturdy piece of Bazzell cardstock for my construction material. I cut it 10 3/8 x 11 5/8 as per my calculations above.
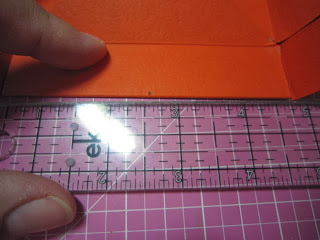
I had chosen do do 1 inch sides, so I scored three lines onto each side in 1 inch increments. This s where it helps to have an easy measurement for the sides that works well for your scoreboard.
Before trimming, I pre-crease all of my sides. Keep in mind how these flaps will be folded and go ahead and crease them in that direction. It's almost a zigzag as you crease them, as the walls of the box go up and one section folds back down into the base.
Now to the trimming. Pay attention here. You still need a flap that will fold into the adjoining side to actually make a box. So be careful as to what you trim away. I've marked out one corner for you below with Xs in the squares that get trimmed off.
And then for that last square in the corner, you just cut one side in as shown below.
Here's another shot below with all four corners trimmed and the flaps for bonding the adjoining walls trimmed.
Now that outer section of each wall will fold back into the base. In order to avoid unnessary bulk, I mitered each corner at 45%. Be careful to only do the outer section.
And here's a sample picture of one trimmed section.
Now compare the trimmed cardstock to the sketc. See how the mitered sectiosn come into play and again, pay attention to those flaps to hold the adjoining walls together.
I like to cut a piece of chipboard to reinforce my base. I cut the chipboard just shy of the base dimension so that it wouldn't interfere with folding....
Be sure to do a dry fit before adhering the chipboard down. That way you can trim off a smidge easily.
Time for construction.
Do three of the walls first and hold off on the last short wall. Hopefully you trimmed your flaps in a direction to where they fold into the short walls.
Dry fold that last wall, but keep it flat. Mark the center of the last wall.
Use a punch to create a notch.
Adhere that last wall into place and you have your custom sized note card holder.
Add your notecards. Feel free to decorate further and maybe even add a ribbon across the top of the notecard holder.
I chose to keep it simple and here's my finished product. I did purposefully go with orange and black for a Harley Davidson feel.


Love it!!
ReplyDeleteOrange! love it
ReplyDeleteThis is great! Wonderful idea for Christmas presents or a hostess gift :-)
ReplyDeleteThis is an awesomely excellent idea! I'm diggin' it! :)
ReplyDelete