

Hey, everybody! Cheryl, here! I'm sharing a Copic Tutorial today. I really wanted to do a video tutorial, however, I have a really good reason for not doing it and you are going to completely agree with me...I desperately need a manicure. My nails and cuticles look horrendous and give the illusion that I should be wringing my hands and cackling maniacally. Yeah, that bad. Anyway, that's not why you're here, so let's get this show on the road ;D
Today I'm sharing the basic techniques I use when coloring with Copics. This post is super picture heavy, so if it loads slowly or clogs things up, I'll just go ahead and apologize in advance. Next time, I'll get the manicure and we won't have this problem ;D
A quick note about how I color. I prefer to color dark to light, but lots of folks like to color light to dark. There is no right or wrong way to do it. Play with both methods and see what feels good to you. Also, I'm a flicker. Yep, I said it, I'm a flicker from way back...LOL! Some folks like to make circles to color and that's fine, too. Again, just do whatever feels more comfortable. The key to blending is making sure you're laying down enough ink to slightly saturate the paper and that you're overlapping your colors so that they blend into each other and there are no harsh lines. Shall we begin ;D

Here's our color palette for today. You'll notice there are a couple of Natural Blending Families. That means that the first letter and the following number are the same, and the last numbers are only a few digits apart. This usually means that these colors will blend together with very little effort. Color combos that do not follow this formulae will also blend, but might require a bit more effort to make them appear seamless.

Here's a snapshot of the supplies I'll be using. Bombshell Angel will be our color victim. Isn't she pretty? My must have tools when working with Copics are Memento Tuxedo Black ink and Neenah Classic Crest 80# coverstock in Solar White. It has a fabulous smooth finish which is great for blending. Visit the Copic website for a list of other recommended inks and papers.

When coloring an image that contains skin, I always begin with the skin. This reduces the chances of me dragging darker colors onto the skin later on. I use a flicking technique to lay down color. This method results in heavier color at the beginning of the stroke and lighter color at the end of the stroke. To me, the lighter color at the end of the stroke sort of sets the color up to readily accept the next color. In the picture you'll see E11 on the top line, then you'll see E11 with the addition of E00 on the second line, and finally you'll see E11, E00, and E000 all blended together.

I start by using E11 to create shadows on the skin. I use it sparingly. I can always add more later if I need to add emphasis to the shaded areas. Also, I've place my light source more or less directly in front of my image. This seems to be the most natural way to color Bombshell Angel.

Next, I use E00, blending over E11 which softens it significantly. I still use the flicking motion covering much of the remaining skin, but I leave areas that will be highlighted with my lightest color.

E000 is the last skintone I apply and the lightest. She's beginning to take shape, but her skin could still use a little something to liven her up. I'll do that with R20 in the next step.

I typically add R20 to cheeks to provide a rosy glow, but it is also fabulous on areas of the skin that might naturally protrude and appear sun-kissed, such as the tops of shoulders and in the case of our bombshell, the outsides of her legs and just ever so slightly the outside of her arms. R20 is very rosy, so go forth with a light hand when adding this to skin.

I soften the R20 with a light blending of E000. Now her skin has more dimension and a soft natural glow.

Usually after coloring skin I like to color hair. Not sure why, I just do. Today we're going to make our Bombshell a brunette.

I start with E37 applying it at the base of each curl and also around her face. Also, I applied just a gentle swipe of B000 across her eyelids and just a dot of red to her lips. No self-respecting Bombshell would ever leave the house without her eye shadow or her lipstick!

Next, I apply E35 just extending it a bit past our last color.

I finish with E31.

Time to color her swimsuit.

I start with BG78, applying shadows to her swimsuit.

Next, I apply BG75, closing in those areas slightly, but leaving space for my lightest color.

I finish her suit by filling the remaining areas with BG72, but wait...her suit looks a bit bland. What can we do? I've got it!

Yes! Some retro polka dots applied with the handy dandy Colorless Blender save the day!
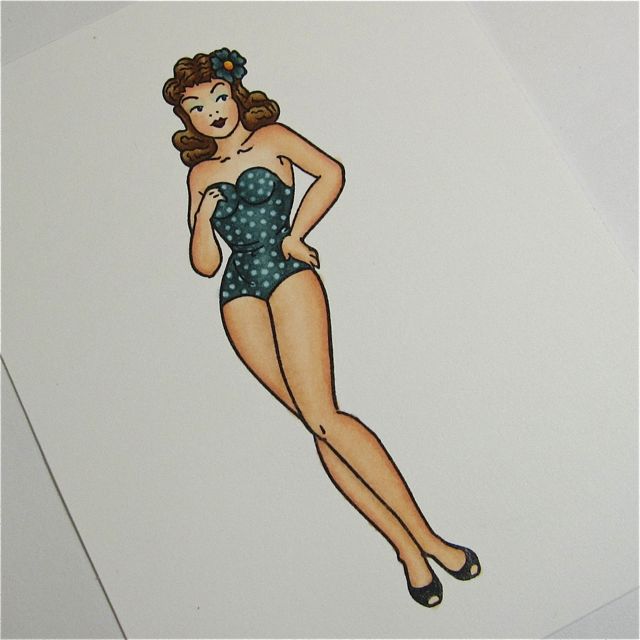
Bombshell Angel is looking stylish and ready for the beach!
So, that's my quick and dirty tutorial on coloring with Copics. Okay, maybe it wasn't so quick...lol! Bombshell Stamps are perfect for honing your Copic skills. They contain just the right amount of details to make it challenging, yet they aren't so detail heavy as to be intimidating. Plus they have a bit more skin than other images so they are great to get a feel for using the Copic skintones or coming up with new skintone combinations. Even though, I posted all of the pictures and added my commentary to each one, the best advice I can give you for coloring with Copics is...PRACTICE. Use them everyday, if you can. They are amazing tools, are very user friendly, and are worth every penny.
Thanks for tuning in today ;D
A great help, thanks for sharing, I can work on my skintones :)
ReplyDeleteThanks so much for posting this fabulous tutorial.
ReplyDeleteI learned so much from it! I never would have thought to use R20 on her shoulders and on the outside of her arms and legs.
Oooooooooooooooooooooooo Cheryl!!! Love Love Love!! So many great tips! Thank you SO much for doing this!!
ReplyDeleteXOXO
Whooo Cheryl!! This is great! And very cleaR!
ReplyDeleteNow I have to find some of those copics.all I seem to get here are the ciao markers,I would love to get the B000....
Thanks so much for this clear tutorial!
This ROCKS!!!! Thank you so much!
ReplyDeleteI SO wish you lived closer so you could give us a "real" class!!! Thanks for the wonderful tutorial!! I'm not very good at blending, yet, and this should help me alot!!! Although, I DO need to get some more coordinating Copics!
ReplyDeleteWhat a great tutorial! Thankyou!!
ReplyDeleteWow! you made it look so easy , thanks for sharing I haven't tried copic markers yet , you just inspired me to try . ; )
ReplyDeleteThanks Cheryl, that is a great tutorial. I don't have any copics, but they are on my list, starting with the skin tone ones. You make it look pretty simple, though I know I will need heaps of practice :)
ReplyDeleteThis is awesome. I would of never thought to do the dots. It turned out so cute. Great coloring.
ReplyDeleteThis is a great tutorial. Love the step outs and pictures. Thanks so much for sharing this how to!
ReplyDelete