full screen background image

Thursday, 31 January 2013

Ms. January - That Went By Quick!

Hello friends!  It's Ms. January Jenn here with you again today and I can hardly believe it's the last day of January - my final post as a Bombshell Pin-Up Girl this month!  I had a great time and really enjoyed working with the gorgeous Bombshell images as well as the fabulous Bombshell ladies!  Thank you again for having me!

Here are my final projects for today!

First up is an ATC I made by using just a small portion of the main image in the Man's Ruin set:

I stamped my sassy Bombshell girl directly onto my DP from My Mind's Eye in a dark grey ink and left her uncolored.  I used some Diamond Stickles on the bubbles and her glass, then stamped Drink Up! onto the same coordinating DP that I used for the background and punched it out with an oval punch, dragged it through a dark grey ink pad and attached with pop dots.  I added some grey pearl sticker embellies to finish it off.

And next is a card I made using the Man's Ruin set:

 I have really become more of a digi stamper over the past few years, so I really had fun doing things with these awesome rubber stamps that I can't do with digis - like stamping in color.  This image was stamped in dark brown on vanilla cardstock and colored with Prismacolor markers.  I used an embossing folder for the background and rubbed it through a dark brown ink pad.  Added a pretty heart charm with some twine and a couple pieces of ribbon from my stash.  Hope you've enjoyed my projects this month as much as I've enjoyed creating and sharing them with you!  Peace.
Wednesday, 30 January 2013

Baby It's Cold Outside! Bombshell's January Hump Day Hop


Hello! Alison here. It's the last Wednesday of the month, soooooooo....you know what that means! It's time for the Bombshell Stamps Hump Day Hop! I don't know about you, but I am cold! So I decided to make this month's hop, "Baby It's Cold Outside!" I wanted the participants to make a Winter themed project, use the theme name as a sentiment, dress up their Bombshells in warm clothes (or not!), etc. So are you ready to see what we've come up with? Here is the entire hop list.


Be sure to leave some love for everyone, and enjoy hopping! I'll be back next Wednesday to announce February's theme! Have a fantastic day!

Tuesday, 29 January 2013

Altered Coaster

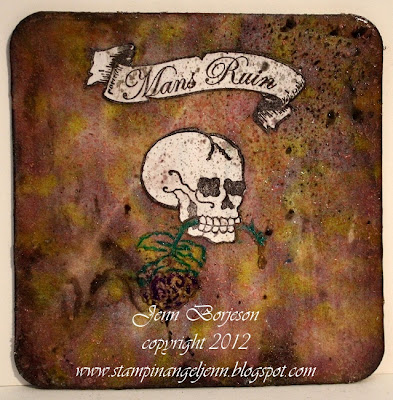
Hi all!  Ms. January Jenn here today with an altered coaster I turned into a magnet using the Man's Ruin set:


I painted a coaster with white Gesso, then stamped my skull image on it in black ink and the broken hearts in red ink.  I colored the rose with markers and then spritzed the entire thing with Silver Foil Smooch Spritz and applied 3-4 layers of UTEE.  I attached a magnet to the back after it was all dry.  Peace.

Monday, 28 January 2013

January Muse Monday -- Week Four!

This month, the Bombshell Girls and Pin-Ups have been showcasing the King of the Road set on Muse Mondays! We hope that our projects inspire you!


Sunday, 27 January 2013

I LOVE YOU! Butterfly Queen

Hello lovelies! Emily here with a "Love Day" card. I am putting this card in my stash of cards. I know Valentines Day is coming up (if you didn't know, you've got about.... roughly 18 days!! To get your love card made!!!) and I needed to make a love inspired card. I typically do not make a lot of LOVE cards, so why not try it out!

Paper comes from Recollections, or DCVW Valentine pack from maybe 2 years ago? The lovely Butterfly Queen has been stamped in Memento, and colored with Prismacolor (skin Beige) and Stampin Up Stampin Write Markers. My scanner cut off some of the detail work I put in the white border space, but that was also done with SU markers.

I hope you find time to make your sweetheart a card for Valentines day.

Much Love,
Em

Friday, 25 January 2013

Washi Tape Background Tutorial

Happy Friday Everyone!

Today's tutorial is an easy way to use Washi Tape and your Bombshell Stamps.


 I like using washi tape as a background for my stamped image. I used the small icon stamps that are in the Bombshell Sets underneath the washi tape.

Supplies:
Bombshell Stamps Lucky Bride Set
Tsukineko Memento Ink in Jet Black
Washi Tape
Copic Markers
Star Bling / rhinestones
adhesive
pop dots
scissors
white cardstock card

First I inked up the stamp I wanted to use as the main image, stamped it and colored it with Copic Markers on white cardstock.  I fussy cut out the image, inked the edges black and set it aside to dry.

I cut out a square using Sizzix dies and a die-cutting/embossing machine, but you can also just cut down a piece of cardstock to 3 1/2 by 3 1/2.  I then stamped the small diamond and bow icon stamp onto the square. 
 Once it was dry, I took a piece of washi tape and placed it across the top of the square, securing the ends of the tape to the back.
I just continued placing the washi tape overlapping the pieces slightly until the entire square was covered.
Next, I placed pop dots underneath this square piece and adhered it onto a white cardstock card. 
I then attached the Bliss Horseshoe stamped image onto the top of the washi tape square using pop dots underneath for more dimension.
 And then added some star bling in each corner.

So there you have it, a quick and easy way to use those icon stamps and a washi tape way to show off your awesome Bombshell artwork!

Hope you enjoyed this tutorial.  If you have any questions please ask below!

Happy Bombshell Craftin'!
- Kim

Wednesday, 23 January 2013

Wonderful Wednesday!

As you may know, every Wednesday we feature a special post. The monthly Hump Day Hop theme is announced the first Monday. Our sketch and the dt's takes on the sketch are scheduled on the second Wednesday. The third Wednesday's features the Guest Designer's (aka Pin-Up's) challenge. Our Hump Day Hop starts on the blog on the last Wednesday of the month.

Every few months there are FIVE Wednesdays, which leaves a huge hole in our schedule, so we needed to come up with something special for it, so we've come up with Wonderful Wednesday. The Bombshell Girls and Pin-ups choose a tutorial from our Fabulous Friday Tutorials and create a project based on the tutorial.

Alaine used Kelli's Tutorial and made some Paper Rosettes, with All My Heart 


Monday, 21 January 2013

January Muse Monday -- Week Three!

This month, the Bombshell Girls and Pin-Ups are showcasing the King of the Road set on Muse Mondays! We hope that our projects inspire you!


Friday, 18 January 2013

Mounting and Storing Unmounted Bombshell Stamps


Today I want to share with you how I organize my Bombshell stamps.  I know that I am a Peeking Polly when it comes to other peoples craft rooms or organizational systems so I thought the other Peeking Pollys out there might like to see my system.

Here is a picture of all the supplies you will need.


Bombshell unmounted stamps come in a sheet of uncut red rubber.  I like to use my unmounted stamps with various acrylic blocks.  I previously used double sided tape to attach my stamps to my blocks but found that it was just not a good way for me to have my stamps ready to go quickly or to keep the stamps organized.


The first thing I do is to use a good craft shears and cut them apart.  I like to cut my stamps as close to the image as possible and to avoid sharp corners if possible.  For some reason sharp corners seem to always get inky and spoil my image when I am stamping.


After cutting out my images, I turn them over to the back and squeeze some Alene’s  Tack It Over and Over Glue onto them.  I have found that a little goes a long way and not to completely cover my stamp.
The glue usually takes several hours to dry so I try and do this step just before bedtime.    If I  am doing lots of stamps at once, I will lay them out on a baking tray so that I can put them out of my way while they dry.


While the stamps are drying I prepare a laminated sheet that will become there permanent home.  I like to keep four sets of Bombshell stamps to each laminate sheet so I generally wait until I have enough new sets.  This is my system.  It is entirely possible to just add one or two sets to each sheet.
I purchase self-laminating pockets from my local Sam’s club, but they can be purchased in smaller amounts from Walmart or office supply stores.   I trim the picture insert that comes with the stamp sets so that four will fit onto a page and then laminate (close the pages together).  The last part of this step is to trim the laminated sheet to fit into an 8x11” page protector that has hole punches for a 3 ring binder.


I attach my now dry stamps to the back of the laminate.  This way I can see what images or on the front.  


I place the laminated page with the stamps into a page protector.


I place the page protector into my Bombshell Binder and Voila all my unmounted Bombshells are now safely organized in a method that is easy for me to use and easy for me to keep updated.  

Wednesday, 16 January 2013

Ms. January Challenge - Heartbreaker

Hello friends!  I was super excited when I found out I had been chosen to be the January Pin-Up Girl for Bombshell.  When I realized I got to choose a challenge theme, I just knew these stamps were perfect for what I had in mind:

Heartbreaker

I know our gorgeous Bombshell stamps will be perfect for this theme - think gorgeous girls, love, literal broken hearts, maybe anti-Valentine's Day?  ;)  

First up is a card from Jenn using Bombshell Angel, and Man's Ruin:

Next is an altered coaster from Jenn using Man's Ruin:

Jodi using Sacred Heart

Alaine also used Sacred Heart


Sparkly Mary using All My Heart


She's a tri-fold card with the diva on a clear acetate layer. 


Susie using "Till Death"


Please link up your Heartbreaker creation below and on our forum for a chance to win some Bombshell Goodies!


~~~~~~~~~~~~~~~~~~~~~~~~~~~~~~~~~~~~


Tuesday, 15 January 2013

Yes........ANOTHER Background tutorial of Stempelientje

Today a easy background tutorial wich creates a bit of a distressed/vintage effect.
Needed: A Brayer, slow drying ink like a chalk ink or so.I used Versafine Onlyx Black, paper and a embossingfolder .
.
Ink up the brayer and ink the inside of your embossing folder with it on one side.
You will use your embossingfolder like a sort of stamp. 
 
 
Put your paper in and run it through your embossing machine.
 
This is how it looks when it gets out.
 
This is the card I made with it.
 
Have a crafty day!

Monday, 14 January 2013

January's Muse Monday -- Week Two

This month, the Bombshell Girls and Pin-Ups are showcasing the King of the Road set on Muse Mondays! We hope that our projects inspire you!


Made by Stempelientje


Here's one by Kathi