full screen background image

Thursday, 31 March 2011

Goldfish Mermaid

     This is one of my favorite mermaid stamps it reminds me of my dad's tattoos.  He's a retired Sailor so he has a few interesting ones.
      I colored this image to look a bit like a goldfish.  I love koi - hmmm maybe I'm going to have to try a koi mermaid next.
      I had bought the paper for this card sometime last summer with the Mermaid Anchor stamp set in mind.  I like the idea of an ocean theme that is NOT blue, green or purple.  Part of the challenge for this card was to make the embellishments.  I punched two circles from the design paper and added acrylic page pebble stickers over them.   The fiber was something in my stash that I have been using for seaweed. Wish I had more but this was the end of it.  I used a bit of Xmas foliage for the sparkly seaweed behind the mermaid.  Next year I'm definitely going to have to hit the Xmas clearance for more and different colors.

Stitching with Bombshells

Last year I stamped my Bombshell Mermaid stamp onto fabric and coloured her in with Copic markers. I made a quilted surround from sea themed fabrics:
Well this time I wanted to use the same stamp but EMBROIDER the mermaid stamp this time!

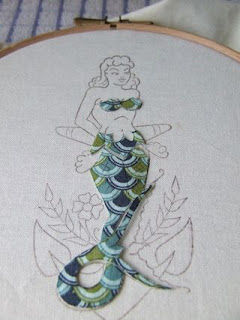
I also wanted to include some fabric for the mermaid's tail and bikini top so I bonded some Bondaweb (to prevent fraying) onto the back of my chosen fabric and stamped the Mermaid's tail and top onto this fabric:


I then carefully cut it out the tail and bikini top from the fabric.

I stamped my Mermaid onto a piece of cream fabric using Staz-On ink and put the fabric into an embroidery hoop.

I took the fabric tail and bikini top I had cut out and used some clear glue to place it onto the mermaid:


I then used a combination of back stitch and satin stitch to outline and fill in the mermaid's image.

I also outlined the fabric tail and bikini top with back stitch.

Once the embroidery was complete I finished the mermaid by attaching her to a collaged and stitched fabric background to make a hanging!


I rubbed a little Rock Candy Stickles over the fabric tail and top to give the mermaid some sparkle!

Hope you enjoyed this project remember stamps make excellent subjects for embroidery!

Happy crafting!

GlitteryKatie xxxx

Wednesday, 30 March 2011

Gift Box Tutorial!

Ok, so this one is going to be a very simple little post to show you how to cover up a small box so you can use it again.  It may seem really simple, but I know it took a little trial and error to get it right, and to make the edges crisp, so I thought what a nice little thing to show you.
 1. Measure the box bottom and sides. Cut a piece of paper such that it is (the width of the bottom plus 2 times the height of the side) by (the length of the bottom and 2 times the height of the side).  
2. Make score lines on the wrong side of paper so that it will fold up both sides of the box. The lines should be the height of the sides on each side of the paper. Then cut lines from the corners to where the corners of the scored lines meet.


3. Add tape to the bottom of the box, and glue the bottom of the box to the area between the score lines. fold all the triangle shapes inward.

4. Take one end of the sides and tape it to the side of the box, taking the triangular flap around the connected edge. for the other two sides, fold the triangular flaps in and glue them down so you have a nice neat edge at the corners. Tape these up to the box.

5. If the edges are slightly too long, you can wrap like I did here.

6. Repeat this process on the box top. I used two different papers to mix it up. For the Box Top, make the sides slightly longer than the actual sides, so you can wrap it around the box top to have a pretty neat edge. Here I forgot to cut down the paper first, and made my score lines first - uh oh... it was too long to wrap so I cut them.


Once I was done making the box, I decorated the top. The Sugar Skull I colored up using the following Copics: E81, 87 to shade it. I also used V91, 93, 95 for the purpley, YG91, 93, 95, 97 and YR61 and 65 to decorate. When I was done I cut it out and then covered it with Crystal Effects to give it a nice shiny glaze. I colored the flower using my airbrush with the YG91, 93 and 95 and then highlighted or actually lowlighted with the V95. I used Pop Up foam to pop it up.

Hope you enjoyed this little tutorial. I hope all of you check out the challenges for this month - both the Sketch challenge and the Paint Challenge!

Citrus Martini


Can I just say, that I adore the Man's Ruin image?  It is so wonderful for almost any sort of celebration.  This time it just happens to be a birthday, but what party couldn't use a girl in a martini glass.  It would sure liven things up.  In this case I didn't think the skull was quite what I wanted so I masked it out and added a bow.  I tend to add whatever I want here, shamrocks, skulls, flowers, maybe an Easter egg next?

For this card I cut out the girl in the glass and covered the glass with crystal effects.  It gave the glass a super shiny appearance that just does't come through in the picture.  It was so much like glass the it cracked right across the girls buttocks. (Me thinks someone needs to loose a few pounds.)  I colored and cut out an extra leg to pop over the top of the glass to give more dimension.  I love layers and so this card has more than a few. I colored the girl's skin with copics and the rest withs Prisma pencils and osm. I added loads of bling added or I wouldn't be the Sparkly Engineer.

Tuesday, 29 March 2011

A sparkling brand new Harley Davidson

Spring arrived and this is the weather to get the bikes out!Today I made this Harley Davidson card.The stamp I used is a of the set : Harley Bikes.I watercoloured the bike,glittered the tank and mudguards and headlight,glazed them and the exhaust also. The banner is of the set: Banner Sayings and I coloured it with Copic markers.

Sunday, 27 March 2011

Design Team Update and a welcome!

Once again, Shannon received amazing applications that featured gorgeous art. She has been busy selecting the next six Guest Designers, aka Monthly Pin-ups. The announcement will be made on the blog next week. A heartfelt thank you to all that applied!

Meanwhile, please join me in welcoming our new full time Bombshell Girls, selected for last term's Pin-Ups!

Congratulations to:
Meredith Winston
Mary Ann Harmon
Alaine Medio
Dawn Knight

We also must bid a fond adieu with attendant thanks to Kas Mello and Stephanie Jones! We hope you stick around and continue to wow us with your wonderful Bombshell creations!

Saturday, 26 March 2011

Homeward Bound...

I finally broke out my Homeward Bound set and put it to ink. I made this card for a blog hop with a group that I belong to. I also submitted it to several different challenges. I love the linen background stamp with this ship image...looks like it's stamped onto linen fabric!


Simple but a great 'guy' card!

Thursday, 17 March 2011

Happy St. Patrick's Day

Happy St. Patrick's Day Everyone!!!!
Here are some Paddy's Day cards BOMBSHELL Stylee!!


We hope you have a wonderful day and enjoy your celebrations!!
GlitteryKatie and the Bombshell Girls xx


March Challenge - It's all about paint!

WooHoo! Anita-Marie here, I'm totally stoked to be Ms. March... :D Yay!!!

My challenge is a free for all

All you need is:

Paint: Paint includes acrylics, acrylic dabbers (Ranger), watercolors, watercolor pencils, Twinklin H20s, Shimmerz, spray paints like Glimmer Mist, etc.

Stazon Ink

Stamps


My challenge for you crafty peeps is all about paint.


Here are a few ways I've used paint on my project sample for this challenge. I've flicked it and used it to colour my stamped images that I have used as embellishments on my layout.


My Hubby and me! It's our first-ever photo together :D I was only 16 in this photo. I'm really lucky to have this photo as half of the film was damaged. :{


I used Stazon ink as it won’t run with watercolours. I hope you all join in and have a bit of messy fun with paint!

I wanna see some awesome projects guys! :D

Cheers Miss March {*Anita*} :D ...


For more inspiration, check out what the rest of the team has put together:

Alaine


Cheryl


Glittery Katie


Kelli


Tuesday, 8 March 2011

March Bombshell Sketch Challenge

Greetings! Alison here. It’s time for a Bombshell Stamps challenge! I love Kathi’s sketches. She always comes up with something fabulous. This month is no different. It has lots of layers, and I love layers!

And here is my colorful interpretation!


I was a little unsure of my color choices for the roses at first, but they have really “grown” on me! I am pretty happy with the end result. I used watercolor markers for the focal image and the banner. Both images are from the Mi Amor Bombshell set.


I inked the edge of the pink cardstock with magenta and purple, and I think it looks really pretty. It added some needed dimension to the cardstock. And can I just say that I adore the Liquid Pearls from Ranger. I only have this one color (platinum) but I seriously need to get some more!


Be sure to try and play along with the Bombshell Sketch, as well as the other Bombshell challenges. There are prizes up for grabs!!! Have an inspiring day!


Kathi's Mardi Gras/Congratulations Sketch card


Kelli


Monday, 7 March 2011

Reminder! Our DT call ends in ONE WEEK!

That's right. You have one week = seven days = 168 hours 'til the March 14th deadline.

Here's a link to all the info you need to complete your application!!!

Good luck!

Tuesday, 1 March 2011

Meet Ms. March -- Anita Marie

Anita Marie is a fabulous stamper who is fantastic with Bombshell's pin-up stamps. She excels in adding details to create the perfect edgy touch.

It's her time in the spotlight, so here's her interview!

***
1. Brief info about yourself, including your name, where you live, your family (if you want), etc.
Hi My name is Anita Marie. I'm 31 years old and live in sunny Queensland Australia with my three beautiful girls Melissa (14), Kara (9), Eve (6), and an awesome hubby, who I love to bits.

I'm absolutely crazy about paper-crafting. It makes me happy. I absolutely loved art class and it was my best subject at school, so art has been a big part of my life.

2. How long have you been stamping and/or crafting?
I've been paper-crafting for eight years so far and I've only been stamping for a year. I'm enjoying every moment of it. I wish that I had started stamping years ago!

3. What are your favorite Bombshell sets and why?
I'm totally a big fan of the Butterfly Queen stamp set as I absolutely love the butterflies and the Bombshell babe. I also love the Love and Luck stamp set with the birds and the roses. It's totally beautiful.

4. What kind of projects do you like to do?
I love all kinds of projects ranging from scrapbooking to ATCs and cards a little bit of mixed media.

5. What are your favorite coloring mediums?
Well I would have to say I do have a few. I love to use Copic markers, water colours , art pencils, and a splash of paint.

6. Describe your crafting "style".
Oh! This is hard one! I would say that I'm totally random. It all depends on my mood at the time.

7. Describe your crafting process. Do you start with a stamp set? A sketch? A technique you want to use?
My crafting process most of the time starts with colours. I do love a technique to get the mojo juices flowing.

8. Do you have any other hobbies?
I only have a few hobbies like fishing and camping. When I'mm in the mood some cross stich but that puts a strain on the peepers. lol

9. Free for all including little facts, etc. about you.
• My scrap studio is always a mess after I create so I can never find my scissors.
• I hate being on a craft budget so I do have to make most of my flowers myself, but I don’t mind as that is being creative and I absolutely love design.
• I have to have music to create it helps me think.
• My fav food is noodles { Seafood Mee Goreng}.

Now that you have learned more about her, check out three of her favorite Bombshell projects!


Since I know that you've loved what you've seen, so go visit Anita Marie's blog and her Bombshell Gallery!