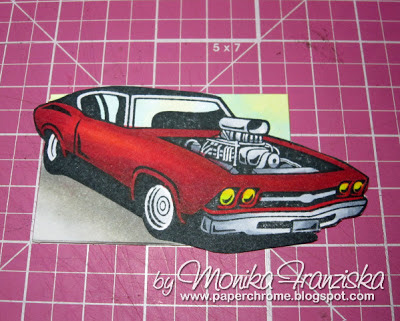
Follow me step by step to see how I made this car come out of the box. This card uses the mojo300 sketch.
1. Stamp and color your image then trim your piece. I like to trim in quarter inch increments. My starting size for this project is 2" x 3 1/4"
Tip: The reason I like to color first is that it gives me a larger piece of paper to hang onto while coloring.
2. Decide how large of a square or rectangle you want left. Figure out how much to trim off. Trimming a 1/4 of an inch on each side is a great place to start. Align a clear ruler with a cutting edge along your project. Use an Exacto knife to trim off the square. Cut up to the stamped image carefully. Lift off. And continue cutting on the other side of the stamped image.
3. Turn your image and repeat the same process as in step 2 above. You can continue this for all four sides.
Variation: I wanted the front end of this car to really come out of the box. So instead of trimming only 1/4 of an inch, I trimmed 3/4 of an inch.
4. After cutting the square or rectangle with your Exacto knife, use a pair of needle point scissors to trim the pieces outside of the square/rectangle.
5. Here's a picture of the car all trimmed. I went back and colored the background of the rectangle. My finished size of the square is 1 3/8 " x 2 1/4. I took a bit more than a 1/4 inch from the top of the car as well.
6. Add some matting. Since you have the finished dimension of the remaining rectangle, you can cut one or more matting layers to make the image pop further. Adhere and use on your project.
Hope you enjoyed this tutorial. Here are a couple more samples that use this technique. It really does work well for the motorcycles as they have so many intricate parts to cut out. This technique lets me get an interesting effect that's almost 3D without a lot of fussy cutting.
Here's the finished card again.
And here are some more cards using this same trimming it out of the square technique. Some of these may look familiar from earlier posts I've done here.


Wow, thanks for sharing this technique and all the wonderful samples.
ReplyDeleteAwesome! I love the 3D look of your cards. Great technique and tutorial! Thank you for sharing this, I can't wait to try it!
ReplyDeletegoing to do this tomorrow. i hate fussy cutting
ReplyDeleteWhat an incredible tutorial! I have MS, so my fine motor skills are basically non-existent. This will be a great way for me to do an image without having to do a lot of fussy cutting. TFS for sharing this and the wonderful samples, Monika.
ReplyDelete