Hello there my beautiful Bombshells!! Happy Friday!! I'm here with you - with a second tutorial for you today!! My darling teammate the ever gorgeous Ms. Alaine Bombshell has brought you an AMAZING magnet tutorial to adorn your fridge, magnetic white boards, etc. I'm showing you how to create something that will adorn YOU!
We are going to create a fabric hair flower. This technique can easily be used and applied to make this into a pin, headband, or an embellishment for a throw pillow or handbag. I learned the technique from my darling friend Joanne here in her video tutorial. I simply translated it to fabric!!
First thing is to pick your fabric. For a hair flower I typically use a solid color fabric. I've found that when I use a heavy pattern that it sort of gets lost in the folds and doesn't stand out well. If you do want to use a pattern, I'd stick with polka dots, stripes, etc. Something simple. I, of course, for this project used my Bombshell Stamps!! I purposefully did not color them in as I didn't want to create too much of a pattern.
I cut my fabric into a relative 10" square. I say "relative" as I'm not huge into measuring when I do a project like this. I'm a big fan of eyeballing it. =) You will then trim the corners off rounding them slightly. Now, with any light colored pencil draw a spiral pattern starting at the outer edge and working in. I then stamped my images at random. Most of them will get covered up in the process but you will see bits and pieces of the images peeking out here and there amongst the flowery folding.
I've used the following sets:
I used the flower from Angel and the tiny anchor and ship's wheel from Sailor. I stamped them using Momento ink. Not that I have any intention of washing this but in the event that it gets wet somehow the ink won't run.
After cutting out your spiral you'll want to slightly crinkle the fabric up in your hands. I had to do it a lot as I used cotton duck fabric which is rather stiff. Now you are going to begin creating your flower.
You want to slightly pinch the fabric starting from the outer most edge and start rolling in towards you (where you started drawing your spiral). A dab of hot glue every inch or so will keep your flower nice and strong.

Keep on rolling in...
Pinch and roll...muss the fabric around a bit until you get it looking how you like then hot glue. The tighter and smaller your flower folds the tighter and smaller your flower will be.
If you want a floppier and looser looking flower - do just that! Keep your rolling loose in your hands and glue in fewer spots. I sort of went somewhere in between.

Keep rolling!
And please...pardon my oh so shabby French Manicure. It's about two weeks old!! (hangs head in shame) But at least I've got a rockin' tan going on! (wink!)
Rollin, rollin, rollin...
Keep that fabric rollin...
By now your spiral should be resembling a flower!
Don't worry...we'll fluff and primp and bling it out at the end!
Keep gluing!!

When most of your fabric has been used up start holding the center for a better grip and keep rolling that fabric!
We'll fold over and fuss up those outer edges at the end.
Almost done!
Once you've used up all of your fabric, you should have a small circle of fabric left which was the center of your spiral. That will end up being the "finishing" piece to hide all of the insides of your flower. You will keep rolling and gluing until the small circle is a flap, of sorts, that needs to be glued to the back of your flower.

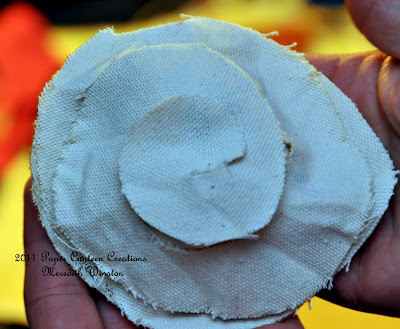
And Voila! (this is the back)
Here are the pieces that I've assembled for my hair flower/pin. I have a sturdy barrette, a large safety pin, a circle of fabric - cut using my Nestabilities, a ship's wheel charm, a few scrap pieces of ribbon (not pictured) and my flower.
You will now hot glue your circular piece of fabric to the back of your flower...as neatly as possible. This is to cover up all of the raw edges of the back of your flower.

Take your scrap pieces of ribbon - I needed three because I used a bit of wider ribbon and glue them carefully down hiding the beads of glue holding your barrette and pin.
There we go...nice and neat.
And VOILA! Here is our finished product!! I added some red and white baker's twine pulling in the very loose nautical theme adhering the ships wheel charm with a tiny dab of hot glue after I added a rhinestone brad through the center. I glued the ends of the twine bow down with teeny dots of hot glue making sure everything is on there securely. I then took my snips and cut up the edges a bit fraying them all intentionally to give my piece more "movement".
So...what do you think? I love how it came out!!
I promise you...I know it looks like a lot of steps but it's really not. I take lots of pictures to make sure I can explain this technique clearly. But it really only takes about 15 minutes or so to make one of these! Let me know if you have any questions!!
I hope you have enjoyed and been inspired...BOMBSHELL style!!


Meredith, so gorgeous and fun! Just like the paper flowers, but even more fabulous! Plus it allows you to wear your Bombshells everywhere! I love that ;D Hugz, Cheryl
ReplyDeleteFab-U-Lous!!!!
ReplyDeleteThis is so pretty. I love how you stamped all over with the different things and how it looks in the end. It is amazing.
ReplyDeleteGreat tutorial. I use this method with paper flowers, AND, I recently did this with Sakura 3-D Colored Lacquer. Check out my tutorial on my blog: http//www.carolberns.blogspot.com for step-by-step. Finally, thank you for your comment on my project, it lead me to your blog...I love it.
ReplyDelete