

It's really simple and I am sorry about that guys, but time was short for this one!!
Ingredients needed:
5 - 4x4 chipboard or matboard pieces
5 - 4x4 patterned paper pieces
pebbles or dew drops
ribbon ( 20 pieces between 4 and 6 inches long)
hole punch
adhesive(ATG, red lined tape used for mine)
Stamps of choice: I used images from Bombshell sets, Rose's Portrait, Cherry Bomb, Sacred Heart Art, and Sugar Daddy

Step 1: Adnere patterned paper to each of the 5 pieces of chip boar or mat board.
(I used the ATG for this)

Step 2: Punch 5 evenly spaced holes on 4 of the paper coverd boards.

Step 3: Using a very strong adhesive(i used red lined tape) adhere the four sides with the holes to the base that does not have holes.

(as you can see I chose for the patterned paper to go on the inside of this one as I knew it would be sitting on my desk...I have made others that have the patterned paper showing on the outside of the bottom because they are sitting on clear shelves...)
Step 4: Once all the sides are attached thread the ribbon pieces through the holes (as shown) to hold the sides together.

( I said 4-6 inches on the ribbon depending on how well you can tie small things...I have chubby fingers and do not do well with small ties so I used 6 inch ribbon, but then cut off quite a bit at the end...)

Step 5: Adhere the pebbles or dew drops around the top and bottom of the box using red lined tape or liquid glue.

Step 6: Decorate as you would like, I used images from the sets mentioned above and adhered them to each side....
Here is the final project...
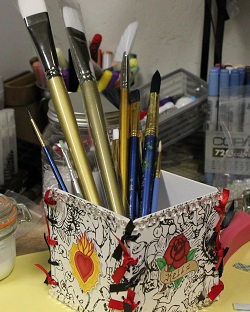
Simple but very very useful!!!! Get some chipboard and start making those boxes to store things in!!!
This is AWESOME Kelli!!! Simple or not...so fabulous and oh so functional!! Thanks for sharing!!!
ReplyDeleteCrafty Hugs!
Meredith
That is a really cool project! I would have never thought of something like that!
ReplyDeleteThis is so cool! I'll definitely have to try this.:)
ReplyDeleteIt's a fabulous tutorial.
ReplyDeleteI've seen people use coasters for this too.
Excellent tutorial. Can't wait to make some of these for my soon to be hobby room
ReplyDeleteKelli, what a terrific tutorial! LOVE this stylish box and it's perfect for a myriad of storage dilemmas. Hugz, Cheryl
ReplyDeleteThis is so pretty! I love the ribbons that lace up the box! Great tutorial!
ReplyDeleteWow, this is awesome! I love the colours too!
ReplyDeleteAwww thanks ladies!!!
ReplyDelete