

Hey there all, and welcome back to another Bombshell Tutorial. One of the things I LOVE about my Bombshells is that I get to dress them with my Copics, and although hose seem to be in the OUT instead of IN fashion wise, I really have fun coloring those sheer things. There is a difference however, in coloring things that aren't sheer and things that are, and that is one of the really beautiful things about Copics - you can layer your color, and get blending, or you can layer completely different colors and make some of the color shine through. Take the hot Girls Ruin Lady (ok, so I cheated on this one, because she had ready made hose drawn on her.)
I start out coloring her entire body as if she is naked. In fact my 11 year old walked by me tonight and said "MOM!!!!! Put some clothers on her!" Sorry, but this is how I do it to make sure that there is skin showing through. Or sometimes I don't... LOL... but that is for a completely other blog post!
Cheryl showed you how she colors dark to light, and I do the opposite, I color light to dark. I start out by coloring the entire image in E000, and then add in E00 and E01 in layers.


I go back and blend them out, and then add in the "sunburn" with R20. I showed that image non-blended, because I wanted you to see where I added it and how little it is. But afterwards, I blend it in with the lightest E color I used - in this case E000.


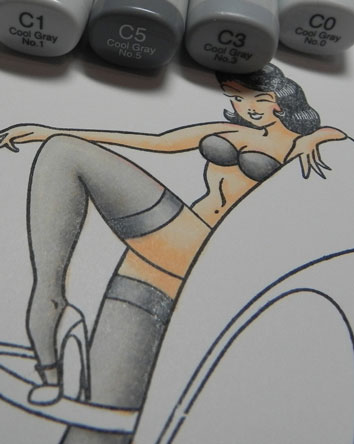
Once all these are colored I start with the hose and bra. I usually go with the Cool Greys to make them look like they are black, but sheer. I am going to play soon with some other colors... but to make this work you MUST have light colors from the family. I start out as if I am coloring over plain white, and layer them in. So, for this, I pretend the skin tone is not there, and color as if grey is the only colors I am using. C0, then C1 and C3 layered in and a little blending. Then C5 added on, and then I back off through the colors - C3, at the edge of the C5, C1 at the edge of the C3 and then a blend of the C0 over the entire area.


 Once she is all blended up, I use either the Brush multiliner, or a small tip multiliner to add in dimension on the top of the hose and the bra so that it looks like lace. You can go really crazy here. I have done (and seen many others do) fishnet hose. I like to go kind of squiggly a lot and make it look more lacy. I also like to add lace and / or ruffles at the top of the hose and or bra.
That is just one of the BEAUTIFUL things about these Bombshells, you can change them up to make them all yours.
Here is a pic of her all finished up, I have a pic of the full card up on my personal blog if you are interested:
 I hope you had a good time, and I hope I was able to convey how I do this to all of you. Please check out our two challenges this month, they are wonderful and you have a chance to win some gorgeous new Bombshell Rubber!
Come back next Friday for another Educational Session!
~~~ Alaine
Yay. Thank you so much. I learned a lot and will go forth and try this.
ReplyDeleteI really love the lace. I guess I'll need to invest in some of the fine tip pens next.
I tried (and failed) to make my "Wild Thing" bride's hose look realistic, but didn't think to add the darker greys as shading. Duh!
I wonder if you guys don't lose comments by people thiking they were done when they hit post comment. This is my second time writing this because the first time I didn't realize there was word verification. It jumps back to the top after you hit post comment and I totally missed it. You might want to change the settings. In any case, thanks for the great tut! I have a hard time with the hose. Love your lacy details too. xxD
ReplyDeleteWonderful tutorial and I admired how you did the lace and hose tops on your card and now I know how. Thanks.
ReplyDelete